Quantcast
Channel: Hurry Up and Wait!
Viewing all 109 articles
Browse latest View live

Easily test Chocolatey package development with Boxstarter 2.2 Hyper-V integration

$
0
0

Hyper-VA couple weeks ago I released Boxstarter v2.2. The primary feature added is the ability to target Hyper-V VMs. Boxstarter can automatically configure them without any manual setup and can both save and restore checkpoints. You can learn about the details here. I’d like to give a big thanks to Gary Park (@gep13) for providing early feedback and helping me catch some holes I needed to fill in to make this release a better user experience. I’m sure I have not identified the last of them so please, create an issue or discussion on the Codeplex site if you run into issues.

This post will discuss how you can use this new feature to greatly reduce the friction involved in Chocolatey package development or in the creation of Boxstarter-style chocolatey packages to develop Windows environments leveraging Hyper-V VMs. No additional Windows licenses will be required. More on that later.

NOTE: Both the Boxstarter.HyperV PowerShell module and Microsoft’s Hyper-V module require PowerShell version 3 or higher on the VM host. This is automatically available on Windows 8 and server 2012. On Windows 2008 R2, it can be installed via the Windows Management Framework.

Integration testing for Chocolatey packages

When you are authoring a Chocolatey package, you are likely creating something that changes the state of the machine upon which the package is installed. It may simply install a single piece of software or it may install several pieces of software along with various dependencies and possibly configure services, firewall port rules, IIS sites, databases, etc. As the package author you want to make sure that the package can run and perform the installation reliably and repeatably and perhaps on a variety of OS versions. This is almost impossible to test directly on your dev environment.

You want one or more virtual environments that can be started in a clean state that mimics what you imagine most others will have when they download and install your package. Furthermore, as you work out the kinks of your package, you want to be able to start over again and again and again. Virtual machines make this workflow possible.

Hyper-V VM technology, there is a good chance you already have it

There are lots of great VM solutions out there. Besides the cloud solutions provided by Amazon, Microsoft Azure, Rackspace and others, VMWare, Hyper-V and Virtual Box are some very popular non cloud options. Hyper-V is Microsoft’s solution. If you have Windows 8 Pro or greater or Windows 2012 or 2008 R2, this technology is available to you for free. I run Windows 8.1 Pro on a Lenovo X1 laptop with 8GB and can usually have 3 VMs running simultaneously. It works very well.

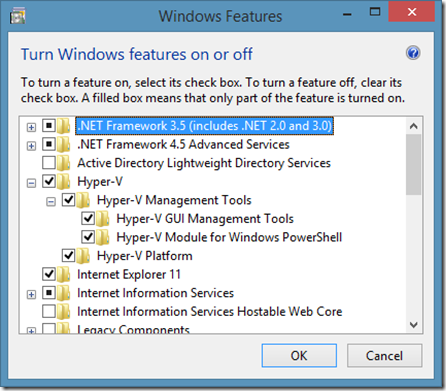
Simply enable the Hyper-V features on your machine either using the “Turn Windows features on or off” GUI

image

or from a command line running:

dism.exe /Online /Enable-Feature:Microsoft-Hyper-V /All
dism.exe /Online /Enable-Feature:Microsoft-Hyper-V-Management-PowerShell

Creating the VM

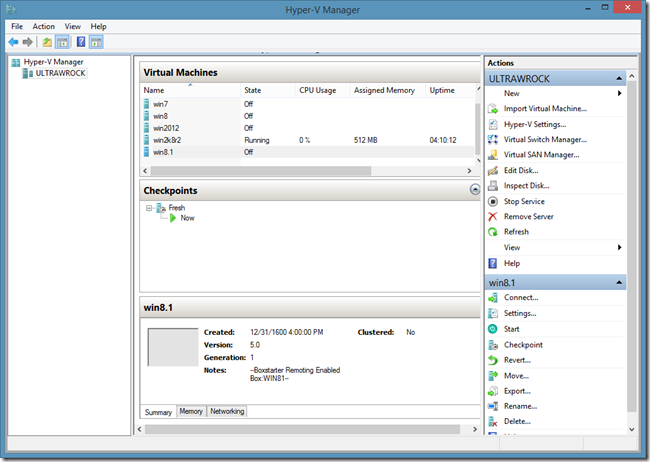
The first thing you need to do is create one or more VMs to reproduce the environment you are targeting. Developing Boxstarter, I have 5 VMs:

image

I have one for every Windows version I care to test on. I save the VM with a base os install with no configuration tweaks other than maybe changing the computer name and adding a admin user. I want to have Windows with the default settings. The first thing you need to get started creating a VM, is a VHD. That is the file type that Hyper-V uses to store the machine. That’s really all a VM is. It’s a file. It can get much more complicated with different VHD formats, differencing disks, Fixed disks, Dynamically growing disks, etc. I’m not going to get into that here and it is not necessary to understand for what I’m going to show you. However if you find yourself working with VMs a lot and want to learn how to maintain them efficiently, you will want to look into those details.

There are two main ways that I typically create a clean Windows VHD:

Create a new VHD and mount a Windows Install ISO as a DVD drive

If you have a Windows installation ISO file, you can mount this to the VM as a virtual DVD drive. Remember those? You need to create an empty VHD file which represents a system with no OS installed. The VM will boot from the virtual DVD and walk you through the Windows Install wizard. This can all be done through the Hyper-V GUI or from PowerShell:

New-VM -Name "myVM" -MemoryStartupBytes 1GB -NewVHDPath "D:\VHDs\w81.vhdx" -NewVHDSizeBytes 60GB
Set-VMDvdDrive -VMName myVM -Path "C:\ISOs\EVAL_EN-US-IRM_CENA_X64FREE_EN-US_DV5.iso"
Start-VM "myVM"

Once I complete the Windows installation and rename the computer, I create a checkpoint so that I can always snap to the point in time when windows had absolutely no additional configuration beyond installation and computer rename.

Checkpoint-VM -Name "myVM" -SnapshotName "BareOS"

Create a new VM from an existing base OS VHD

After performing the above procedure from an ISO, I like to “freeze” the VHD of the newly installed OS. To do this, I create a differencing disk of that VHD and mark the original VHD as read only. Now I can create new VMs based on the differencing disk that contains only the difference of the fresh install and all subsequent work. Here, I’ll create a differencing VHD based on the VHD we created for our new VM above and then we will attach it to the new VM:

Stop-VM myVM
New-VHD -Path "D:\VHDs\w81diff.vhdx" -ParentPath "D:\VHDs\w81.vhdx" -Differencing
Set-VMHardDiskDrive -VMName myvm -Path "D:\VHDs\w81diff.vhdx"
Start-VM myVM


Downloading evaluation versions of Windows installers

You don't need a purchased copy of Windows or a fancy shmancy MSDN subscription to get a Windows OS for testing purposes. As of this posting, anyone can download evaluation copies of Windows 8.1, Server 2008 R2 and 2012 R2. The evaluation period is between 90 and 180 days depending on the version you download. In addition to the ISO, the server OS versions also provide an option to download VHD’s. These allow you to skip the OS installer. They come with a builtin Administrator account with a password set to Pass@word1. Convenient since that is the same password I use for all of my personal online accounts. When the evaluation expires, it is perfectly legal to simply start over from the original installer or VHD. Here are the current URLs you can use to download these evaluations:

Connecting the VM to the internet

While it is certainly possible and sometimes desirable to write Chocolatey packages that work fine offline, chances are that you want your VM to be able to access the world wide web. There are several ways to do this. For most “normal” dev environments, the following approach should work.

Get a listing of your Network Adapters:

C:\> Get-NetAdapter

Name                      InterfaceDescrip                        ifIndex Status                                                                          s
----                      --------------------                    ------- -----
Bluetooth Network Conn... Bluetooth Device (Personal Area Netw...       5 Di...
Wi-Fi                     Intel(R) Centrino(R) Advanced-N 6205          3 Up


Next add a “Virtual Switch” that binds to your actual network adapter. This only has to be done once on the VM host. The switch can be reused on all guests created on the host. After adding the switch, it can be applied to the VM:

New-VMSwitch -NetAdapterInterfaceName "Wi-Fi" -Name MySwitch
Set-VMSwitch -Name "myVM" -VMSwitch "MySwitch"

In my case, since I am using a wireless adapter, Hyper-V creates a network bridge and a new Hyper-V adapter that binds to the bridge and that any VM using this switch will use.

Getting Boxstarter

There are lots of ways to get the Boxstarter modules installed. If you have Chocolatey, just CINST Boxstarter. Otherwise, you can download the installer from either the codeplex site or Boxstarter.org and run the setup.bat in the zip file and then open a new PowerShell window. Since the Boxstarter.HyperV module requires at least PowerShell 3 which can auto load all modules in your PSModulePath and the Boxstarter installer adds the Boxstarter modules to that path, all Boxstarter commands should be available without needing to import any modules explicitly.

Tell Boxstarter where your packages are and build them

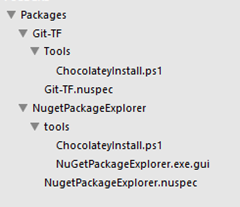
Perhaps the packages you want to test have not yet been pushed to a nuget feed and you want to test the local development version. Boxstarter provides several commands to make creating packages simple. See the boxstarter docs for details. We’ll assume that we have pulled our package repository from source control to a local Packages directory. It has two packages:

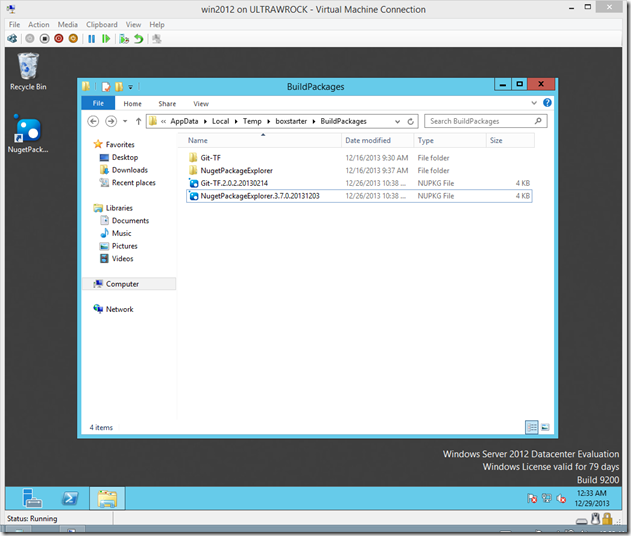
image

Now we will tell Boxstarter where our local packages are stored by changing Boxstarter’s localRepo setting from the default BuildPackages folder in Boxstarter’s module directory to our package directory.

C:\dev\Packages> Set-BoxstarterConfig –LocalRepo .
C:\dev\Packages> $Boxstarter

Name                           Value
----                           -----
IsRebooting                    False
NugetSources                   http://chocolatey.org/api/v2;http://www.myget...
BaseDir                        C:\Users\Matt\AppData\Roaming\Boxstarter
LocalRepo                      C:\dev\packages
RebootOk                       True
Log                            C:\Users\Matt\AppData\Local\Boxstarter\boxsta...
SuppressLogging                False


Checking the $Boxstarter variable that holds our boxstarter settings confirms that Boxstarter is tracking our local repository where we are currently working.

Now Boxstarter can build our packages by using the Invoke-BoxstarterBuild command:

C:\dev\Packages> Invoke-BoxStarterBuild -all
Boxstarter: Scanning C:\dev\packages for package folders
Boxstarter: Found directory Git-TF. Looking for Git-TF.nuspec
Calling 'C:\Chocolatey\chocolateyinstall\nuget.exe pack .\Git-TF\Git-TF.nuspec -NoPackageAnalysis'.
Attempting to build package from 'Git-TF.nuspec'.
Successfully created package 'C:\dev\packages\Git-TF.2.0.2.20130214.nupkg'.

Your package has been built. Using Boxstarter.bat Git-TF or Install-BoxstarterPackage Git-TF will run this package.
Boxstarter: Found directory NugetPackageExplorer. Looking for NugetPackageExplorer.nuspec
Calling 'C:\Chocolatey\chocolateyinstall\nuget.exe pack .\NugetPackageExplorer\NugetPackageExplorer.nuspec -NoPackageAnalysis'.
Attempting to build package from 'NugetPackageExplorer.nuspec'.
Successfully created package 'C:\dev\packages\NugetPackageExplorer.3.7.0.20131203.nupkg'.

Your package has been built. Using Boxstarter.bat NugetPackageExplorer or Install-BoxstarterPackage NugetPackageExplorer will run this package.

This iterates all folders in our local repo and creates the .nupkg files for all our package nuspec files. Note that if we do not want to build every package we could specify a single package to build:

C:\dev\Packages> Invoke-BoxStarterBuild -Name Git-TF

Testing the packages in your VMs

Now we are ready to test our packages. Unless the package is incredibly trivial, I like to test on at least a PowerShell 2 and a Powershell 3 (or 4) environment since there are some unobvious incompatibilities between v2 and post v2 versions. We will test against Server 2012 and Server 2008 R2. We can pipe our VM names to Boxstarter’s Enable-BoxstarterVM command which will inspect the VM and ensure that Boxstarter can connect to the VM using PowerShell remoting. If it can not, Boxstarter will manipulate the VM machine’s registry settings in its VHD to enable WMI Firewall rules which will allow Boxstarter to connect and enable PowerShell remoting. We will also ask Boxstarter to restore a checkpoint (named “fresh”) that we previously set which brings the VM to a clean state.

After ensuring that it can establish connections to the VMs, Boxstarter copies the Boxstarter modules and the local repository nupkg files to the VM. Then Boxstarter initiates the installation of the package on the VM.

So lets have Boxstarter test a package out on our VMs and analyze the console output.

C:\dev\Packages> "win2012","win2k8r2" | Enable-BoxstarterVM
-Credential $c -CheckpointName fresh | Install-BoxstarterPackage -PackageName NugetPackageExplorer -Force
Boxstarter: fresh restored on win2012 waiting to complete...
Boxstarter: Configuring local Powershell Remoting settings...
Boxstarter: Testing remoting access on win2012...
Boxstarter: Testing WSMAN...
Boxstarter: fresh restored on win2k8r2 waiting to complete...
Boxstarter: Configuring local Powershell Remoting settings...
Boxstarter: Testing remoting access on WIN-HNB91NNAB2G...
Boxstarter: Testing WSMAN...
Boxstarter: Testing WMI...

Here I pipe the names of my VMs to Boxstarter’s Enable-BoxstarterVM command. I have a checkpoint named “fresh” which is my “clean” state so Boxstarter will restore that checkpoint before proceeding. The result of Enable-BoxstarterVM, which is the computer name and credentials of my VMs, is piped to Install-BoxstarterPackage which will perform the package installation.

We can see that Boxstarter checks WSMan, the protocol used by PowerShell remoting, and if that is not enabled it also checks WMI. Windows 2012 has PowerShell remoting enabled by default so there is no need to check WMI, but Server 2008 R2, does not have PowerShell remoting enabled and thus checks for WMI. I am using the built-in administrator account and WMI is accessible. Therefore Boxstarter does not need to make any adjustments to the VM’s registry. If WMI was not accesible or if I was using a local user, Boxstarter would need to edit the registry and enable the WMI ports and also enable LocalAccountTokenFilterPolicy for the local user.

Also note that the 2008 R2 VM has a different computer name than the VM Name, WIN-HNB91NNAB2G. Boxstarter will find the DNS name of the VM and pass that on to the Install-BoxstarterPackage command which needs that to establish the remote connection.

Boxstarter Version 2.2.56
(c) 2013 Matt Wrock. http://boxstarter.org

Boxstarter: Configuring local Powershell Remoting settings...
Boxstarter: Configuring CredSSP settings...
Boxstarter: Testing remoting access on win2012...
Boxstarter: Remoting is accesible on win2012
Boxstarter: Copying Boxstarter Modules and local repo packages at C:\dev\Packages to C:\Users\Matt\AppData\Local\Temp on win2012...
Boxstarter: Creating a scheduled task to enable CredSSP Authentication on win2012...

Here Boxstarter begins the install on win2012. It determines that remoting to the VM is accessible, copies the Boxstarter modules and the local packages and enables CredSSP (using CredSSP allows Boxstarter packages to access other remote resources that may need the user’s credentials like network shares).

[WIN2012]Boxstarter: Installing package 'NugetPackageExplorer'
[WIN2012]Boxstarter: Disabling Automatic Updates from Windows Update
[WIN2012]Boxstarter: Chocolatey not instaled. Downloading and installing...
[WIN2012]+ Boxstarter starting Calling Chocolatey to install NugetPackageExplorer. This may take several minutes to complete...
Chocolatey (v0.9.8.23) is installing 'NugetPackageExplorer' and dependencies. By installing you accept the license for'NugetPackageExplorer' and each dependency you are installing.
______ DotNet4.5 v4.5.20120822 ______
Microsoft .Net 4.5 Framework is already installed on your machine.
______ NugetPackageExplorer v3.7.0.20131203 ______
Downloading NugetPackageExplorer 64 bit (https://github.com/mwrock/Chocolatey-Packages/raw/master/NugetPackageExplorer/NpeLocalExecutable.zip) to C:\Users\ADMINI~1\AppData\Local\Temp\chocolatey\NugetPackageExplorer\NugetPackageExplorerInstall.zip
Extracting C:\Users\ADMINI~1\AppData\Local\Temp\chocolatey\NugetPackageExplorer\NugetPackageExplorerInstall.zip to C:\Chocolatey\lib\NugetPackageExplorer.3.7.0.20131203...
NugetPackageExplorer has finished successfully! The chocolatey gods have answered your request!'C:\Chocolatey\lib\NugetPackageExplorer.3.7.0.20131203\NugetPackageExplorer.exe' has been linked as a shortcut on your desktop
File association not found for extension .nupkg
    + CategoryInfo          : NotSpecified: (File associatio...xtension .nupkg
   :String) [], RemoteException
    + FullyQualifiedErrorId : NativeCommandError
    + PSComputerName        : win2012

Elevating Permissions and running C:\Windows\System32\WindowsPowerShell\v1.0\powershell.exe -NoProfile -ExecutionPolicy unrestricted -Command "& import-module -name  'C:\Chocolatey\chocolateyinstall\helpers\chocolateyInstaller.psm1'; try{cmd /c assoc .nupkg=Nuget.Package; start-sleep 6;}catch{write-error 'That was not
sucessful';start-sleep 8;throw;}". This may take awhile, depending on the statements.
Elevating Permissions and running C:\Windows\System32\WindowsPowerShell\v1.0\powershell.exe -NoProfile -ExecutionPolicy unrestricted -Command "& import-module -name  'C:\Chocolatey\chocolateyinstall\helpers\chocolateyInstaller.psm1'; try{cmd /c ftype Nuget.Package="C:\Chocolatey\lib\NugetPackageExplorer.3.7.0.20131203\NugetPackageExplorer.exe" %1; start-sleep 6;}catch{write-error 'That was not sucessful';start-sleep 8;throw;}". This may take awhile, depending on the statements.
NuGet Package Explorer has finished successfully! The chocolatey gods have answered your request!
Adding C:\Chocolatey\bin\NuGetPackageExplorer.bat and pointing to '%DIR%..\lib\nugetpackageexplorer.3.7.0.20131203\nugetpackageexplorer.exe'.
Adding C:\Chocolatey\bin\NuGetPackageExplorer and pointing to '%DIR%..\lib\nugetpackageexplorer.3.7.0.20131203\nugetpackageexplorer.exe'.
Setting up NuGetPackageExplorer as a non-command line application.
Finished installing 'NugetPackageExplorer' and dependencies - if errors not shown in console, none detected. Check log for errors if unsure.
[WIN2012]+ Boxstarter finished Calling Chocolatey to install NugetPackageExplorer. This may take several minutes to complete... 00:00:31.8857706
[WIN2012]Boxstarter: Enabling Automatic Updates from Windows Update

Errors       : {File association not found for extension .nupkg}
ComputerName : win2012
Completed    : True
FinishTime   : 12/28/2013 1:05:13 AM
StartTime    : 12/28/2013 1:04:00 AM

Now we see mostly what we would expect to see if we were doing a vanilla CINST via Chocolatey. What is noteworthy here is that Boxstarter outputs an object to the pipeline for each VM. This object holds basic metadata regarding the installation including any errors encountered. In our case, the installation did produce one non-terminating error. Overall the install is successful.

Now Boxstarter moves on to the Server 2008 R2 VM.

Boxstarter: Testing remoting access on WIN-HNB91NNAB2G...
Boxstarter: Enabling Powershell Remoting on WIN-HNB91NNAB2G
Boxstarter: PowerShell Remoting enabled successfully
Boxstarter: Copying Boxstarter Modules and local repo packages at C:\dev\Packages to C:\Users\Matt\AppData\Local\Temp on WIN-HNB91NNAB2G...
Boxstarter: Creating a scheduled task to enable CredSSP Authentication on WIN-HNB91NNAB2G...

This is slightly different from the Server 2012 install. PowerShell remoting was not initially enabled on Windows 2008 R2; so Boxstarter needed to enable it before it could copy over the Boxstarter modules and local packages.

[WIN-HNB91NNAB2G]Boxstarter: Installing package 'NugetPackageExplorer'
[WIN-HNB91NNAB2G]Boxstarter: Disabling Automatic Updates from Windows Update
[WIN-HNB91NNAB2G]Boxstarter: Downloading .net 4.5...
[WIN-HNB91NNAB2G]Boxstarter: Installing .net 4.5...
[WIN-HNB91NNAB2G]Boxstarter: Chocolatey not instaled. Downloading and installing...

[WIN-HNB91NNAB2G]Boxstarter: Enabling Automatic Updates from Windows Update
[WIN-HNB91NNAB2G]Boxstarter: Restart Required. Restarting now...
Boxstarter: Waiting for WIN-HNB91NNAB2G to sever remote session...
Boxstarter: Waiting for WIN-HNB91NNAB2G to respond to remoting...

Next is more activity that we did not see on Server 2012. Server 2008 R2 comes with .Net 2.0 installed. Chocolatey needs at least 4.0 and Boxstarter will install v4.5 if v4.0 is not installed since v4.5 is an “in place upgrade” from 4.0 and thus includes 4.0. After installing .Net4.5 and Chocolatey, there is a pending reboot. Boxstarter needs to reboot the VM before proceeding with the install in order to reduce the risk of a failed install.

The remainder of the Server 2008 R2 install is identical to the Server 2012 install and so we will not examine the rest of the output.

Now your VMs should have the NugetPacketExplorer installed and all *.Nupkg files should be associated with that application.

image


Creating Checkpoints

In the Enable-BoxstarterVM call we saw above, we restored to a known clean state that we had previously saved. However, we can also have Boxstarter create the clean state. In the example we used above, we hade a checkpoint named “fresh” that Boxstarter restored. If that checkpoint did not exist, Boxstarter would have created one just after exiting Enable-BoxstarterVM.

Rolling package testing into Continuous Integration

This post shows you how you can use Boxstarter and Hyper-V to create an environment where you can easily test package development. However, wouldn’t it be great to take this to the next level and have your package checkins automatically kickoff a package install on a Azure or AWS VM? My next post will explore just that which will be possible when I release the Windows Azure integration.
Save disk space and store your VHDs on an SD card

$
0
0

About a year ago, I puchased a Lenovo X1 Carbon laptop as my primary personal dev machine. I absolutely love it! Almost inappropriately so…almost. The only thing I wish it had was more disk space. I settled for the 128GB SSD. The upgrade to 256GB was just too much of a price jump for me. I think 128GB is likely fine for most folks but I work a fair amount with VMs and those guys can be hogs. My disk would occasionally fill up and I’d find that the majority of space was taken up by my VM’s VHD files.

SD Card Readers are becoming commonplace in modern laptops

Well it so happens that there is a small hole in this laptop that can be filled with an SD card. I hadn’t used one of those in years when I used to have a camera that lacked a phone so it was something I had overlooked. These can accommodate a variety of capacities. The largest that I have seen is 256GB but at a cost of about $900.00. More commonly found and affordable cards range from about 16 to 64GB. So I figured if I could put my VHDs on one of those, I’d get a 50% boost in hard disk capacity. The placement of the drive is convenient too. Unlike a USB thumb drive. SD Cards don’t stick out but can go unnoticed fully nuzzled in the side of my laptop.

Initial performance was abysmal

I forked out 50 dollars for a Lexar 64GB SDXC Class 10 U1 card. I was unsure how these cards would perform compared to my SSD. Its one thing to read the specs which typically include “MAX” MB/s speeds, but another to see how something will work under my particular workloads. Obviously if it was going to be slow, this would not be a workable option for me. It was really super slow.

For many this will come as no surprise. My SD card is rated at 60MB/s for Reads and less (not sure what the write rate is) for writes. You can get cards that are much faster but in my interest of keeping costs down, the higher speed cards were not a viable option. My VMs took a long time to boot. I wrote it off and figured hopefully I’ll find another use for the lost 50 bucks.

Differencing disks on the SSD to the rescue

Then a couple weeks later I had an idea. I cant remember what made me think of it but I wondered if I created differencing disks from my base VHDs and put those on my SSD and the parent VHDs on the SD card, what would performance be like. With this setup, the SD would only be accessed for reads (which it excels at over writes) and all writes would go to my SSD. I gave this a shot and the performance pretty much felt the same as it had been when running entirely on my SSD. I should have done a better job of collecting hard numbers but I didn’t so this is simply how it “felt”.

As far as space goes, all 5 of my base VM VHDs consume about 60GB of my SD so I am certainly saving space. I used to often go into the red with just a few gigs or less remaining on my SSD. I always have plenty of space since switching t this configuration a couple months ago. My differencing disks consume much less space and almost consume nothing when I revert my VMs to their initial state which I do often.

Your mileage may vary

Of course everyone’s workload and I/O patterns will vary. What is working for me may very well perform horribly for you. If you have an empty SD reader and are finding yourself often crunched for disk space, it may be worth considering this configuration.

Visual Studio Installations: The 15 minutes you will never see again. Don’t do it. Have Chocolatey do it for you.

$
0
0

image

For the .Net developer, reinstalling Visual Studio is not far from repaving your machine. Its something almost all of us has had to do. No doubt it gets faster in every version. I remember when VS 2003 would take hours and you had to sit there looking at goofy model engineers and read scrolling marketing text. I already bought the damn product. If you are so awesome why am I sitting here completely unproductive?! Thank god those days are gone, but it still takes a lot longer to install than Minecraft.

About 18 months ago, I joined a new team where we had to work against new Visual Studio builds and reinstalling Visual Studio was AT LEAST a weekly event. I then hunkered down and looked into how to install Visual Studio unattended. Then I created Chocolatey packages for it.

Chocolatey, here to save you from the tyranny of Next…Next…Finish

Look. Just finish. I don’t do Next anymore. There is nothing of value at Next.Its simply a passing, transient WPF form standing between where you are now and your ability to deliver something awesome.

Chocolatey is a great tool every Windows dev and power user should have. Here is how it works:

  1. I need a tool, lets say fiddler for inspecting HTTP traffic.
  2. I pop open a command prompt and type CINST fiddler
  3. I do something else for a minute.
  4. I have fiddler installed and ready to run.

Chocolatey has almost 1500 software packages that follow this same model. Most are dev tools so the chances are that your tool is in the public Chocolatey feed. You are wasting your time going to the web and searching for a GIT download and reading up on how to install it. Just type CINST GIT and be done with it.

Getting Visual Studio with Chocolatey

Since there are different Visual Studio SKUs (Ultimate, Professional, etc.), there re separate Visual Studio Chocolatey Packages for each. I have created packages for most of them covering versions 2012 and 2013. Go to Chocolatey.org and search for “visual studio ide”. You will see a bunch of them.

If you have Chocolatey, simply run:

CINST VisualStudio2013ExpressWeb

That’s it. Give it 10 to 20 minutes and you have it. Oh you wanted Resharper too? Quit your crying and enter: CINST resharper.

How do I pay for the Non-Express SKUs?

If you work with the professional or ultimate Visual studio SKUs, you likely have the product key. Install Visual Studio via Chocolatey and you will be prompted for your key upon first use. I believe (I could be wrong here) that you have 30 days to enter the key.

How do I specify the Visual Studio features I want installed?

The non-express skus all have at least a half dozen features you can add to the initial download and install. These include some very valuable features like the Web Tooling that brings in CSS and Javascript editing goodness. By default, a Chocolatey flavored Visual Studio install does not install any of these. Most people want either none or just one or two. However, as of today, I have added support for specifying optional features in the Chocolatey install command. It leverages the –InstallArguments parameter. Here is an example:

cinst VisualStudio2013Ultimate -InstallArguments "WebTools Win8SDK"

This installs both the Web tooling features and the Windows 8 Store Apps SDK. Here are all of the available feature names:

  • Blend
  • LightSwitch
  • VC_MFC_Libraries
  • OfficeDeveloperTools
  • SQL
  • WebTools
  • Win8SDK
  • SilverLight_Developer_Kit
  • WindowsPhone80

I didn’t make these names up. They come from the AdminFile SelectableItemCustomization strings.

Uninstalling and Reinstalling

Sometimes we want to start over from scratch and with Visual Studio, the uninstall is not much faster than the install. So that is nice to script as well and Chocolatey has you covered here. The Visual Studio 2013 packages come with uninstallers. So if you wanted to say uninstall and then reinstall in one script, it would look like this:

CUNINST VisualStudio2013Ultimate
CINST VisualStudio2013Ultimate

The uninstaller looks through your installed MSI packages for the correct uninstaller and invokes it with instructions to run passively.

Visual Studio loves Rebooting

Here again, things are much better than they were years ago. One can typically install an Express or optionless install of Visual Studio never needing to reboot. However, once you start adding features, in addition to perhaps installing the .Net framework, SQL Server and on and on, a reboot (or a couple) becomes nearly inevitable.

In these cases check out Boxstarter. That’s my little project and I’m proud to say both it and Chocolatey were given a mention in Scott Hanselman's 2014 Ultimate Developer and Power Users Tool List for Windows. Boxstarter provides an environment for invoking Chocolatey packages that is reboot resilient. It also allows you to run them on remote machines and Hyper-V VMs. Have a couple VMs that need Visual Studio? Run:

$c=Get-Credential administrator"VM1","VM2" | 
Enable-BoxstarterVM -Credential $c -Checkpoint BareOS |
Install-BoxstarterPackage -PackageName VisualStudio2013Ultimate –Force

This will run the VisualStudio installer on Hyper-V VMs named VM1 and VM2. If there are pending reboots before the install, Boxstarter will reboot the VM. If you need to install multiple packages (maybe SqlServer and the IIS Windows Feature), Boxstarter will check for pending reboots before each package. There is lots of information on running Boxstarter at Boxstarter.org.

Released Boxstarter 2.3: Windows Azure integration

$
0
0

Just a month after releasing integration with Hyper-V, I am pleased to announce support for auto connection configuration and first class Checkpointing in Windows Azure VMs. Boxstarter can now make cloud provisioning of your boxes a straight forward process.

What does this do?

For readers unfamiliar with Boxstarter or Chocolatey, this makes the provisioning of Azure VM’s with all of the tools, applications, settings, patches, etc that you require a simple and repeatable event. If you spend much time building out VMs, tearing them down and then rebuilding them again and again, please stop immediately. Create a Chocolatey package to define your server’s end state and let Boxstarter push it out.

What I have just described can be accomplished on a local physical box, a remote physical box or a VM. Below I will describe the features in this release that apply specifically to the newly released Azure Integration.

Auto Connection Configuration

Boxstarter uses Powershell remoting to initiate provisioning. By default, Azure enables Powershell remoting on all of its Windows server VMs. However, there are a few not so obvious steps involved to make a connection to the VM. Boxstarter will locate the DNS name of the VM and the WinRM port listening for remoting connections. Boxstarter will also download the SSL certificate on the machine and install it locally. This allows Boxstarter to make a secure connection with the VM and invoke the provisioning of your server.

Checkpoints

If you are familiar with almost any popular VM technology, you are certainly familiar with checkpointing (also known as Snapshots). This is the ability to save the state of the VM at a particular point in time and later restore to that point. Unfortunately Azure VMs do not easily expose this same functionality. You can create SysPrepped images in the portal, attach and detach disks, but there is no clear and simple way to take and restore a checkpoint let alone several checkpoints.

Boxstarter makes this possible by leveraging Azure Blob Snapshots under the hood and exposing this via four commands:

  • Set-AzureVMCheckpoint
  • Get-AzureVMCheckpoint
  • Restore-AzureVMCheckpoint
  • Remove-AzureVMCheckpoint

Each of these take a VM and CheckpointName parameter. Just like the Hyper-V integration, Boxstarter can create and restore checkpoints as part of the provisioning process since you may want to take or restore a checkpoint just before provisioning begins. For more information regarding their usage, please view their commandline help or visit Boxstarter.orgs Azure documentation page.

Case Study: Provision a public Minecraft server

You and your friends have decided to play homage to your local NFL team’s upcoming Superbowl challenge by constructing a replica of the team’s arena within a Minecraft landscape. You need a server that everyone can connect to and contribute as time permits. It’s a common cloud deployment scenario. We’ve all been there.

Step One: Get the Boxstarter.Azure module

The Boxstarter.Azure module does not install along with the core Boxstarter bits. To download and install it along with all of its dependencies, run:

CINST Boxstarter.Azure

Note: You will need to be running at least Powershell version 3. You can run:

$Host.Version

at any powershell console to determine your version and if you are running a previous version, you can install Powershell version 3 or 4 via Chocolatey.

Now, for best results, open the Boxstarter Shell to run the rest of this sample.

Step Two: Configure your Azure subscription

There is a one time configuration step required so that the Azure Powershell commands know which account to manage and also know that you are authorized to manage it. This step includes running three commands:

Get-AzurePublishSettingsFile

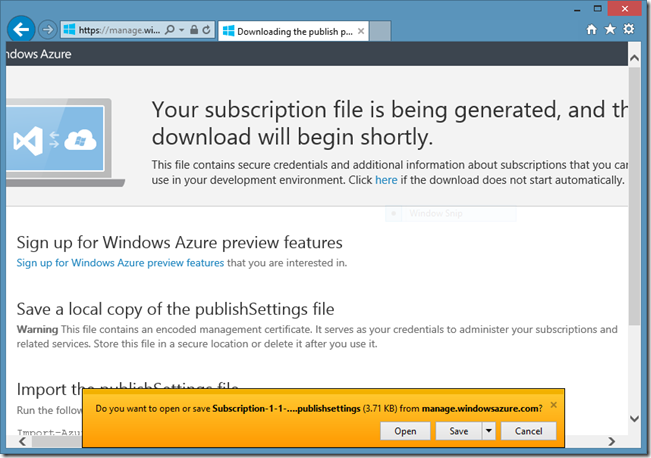
This command will launch your default browser and initiate a Publisher Settings download. First you will land on the Windows Azure sign in page and as soon as you successfully authenticate, the download will begin.

Now simply import the file that was just downloaded:

Import-AzurePublishSettingsFile -PublishSettingsFile C:\Users\Matt\Downloads\Subscription-1-1-19-2014-credentials.publishsettings


Finally, specify the name of the storage account you want to use. You can run Get-AzureStorageAccount for a list of all of your storage accounts.

Set-AzureSubscription -SubscriptionName MySubscription -CurrentStorageAccountName MyStorageAccount

Note: Boxstarter will attempt to set your Current Storage Account for you if it has not been specified. However, you will need to run the command yourself if you need to run other Windows Azure Powershell commands prior to using Boxstarter.

Thats it. You can now use the Windows Azure Powershell and Boxstarter commands to provision VMs in Azure.

Step Three: Create the Azure VM

$cred=Get-Credential AzureAdmin
New-AzureQuickVM –ServiceName BoxstarterTest1 -Windows -Name MyVM `
  -ImageName 3a50f22b388a4ff7ab41029918570fa6__Windows-Server-2012-Essentials-20131217-enus `
  -Password $cred.GetNetworkCredential().Password -AdminUsername $cred.UserName `
  -Location "West US"–WaitForBoot

This uses the Azure Powershell module to create a new Cloud Service and a new small VM with Server 2012 R2 in Azure’s West US data center which just so happens to reside relatively near your football team. How convenient. Ehh…maybe not. But it is a pretty neat coincidence. Note that if you are reusing an existing Cloud service in the command above, you want to omit the –Location argument since the location of the existing service will be used.

Step Four: Create your Chocolatey package

Getting a Minecraft server up and running is really pretty simple. Here is the script we will use:

CINST Bukkit
Install-WindowsUpdate –AcceptEula
New-NetFirewallRule -DisplayName "Minecraft" -Direction Inbound -LocalPort 25565 -Protocol TCP
-Action Allow
Invoke-WmiMethod Win32_Process Create -Args "$env:systemdrive\tools\bukkit\Bukkit.bat"

This installs Bukkit, a popular Minecraft server management software which will also install the Java runtime. It will install all critical Windows updates. Then we allow inbound traffic to port 25565, the default port used by Minecraft servers. We will save this in a Gist and use the RAW gist url as our package source. The Url for the gist is:

https://gist.github.com/mwrock/8518683/raw/43ab568ff32629b278cfa8ab3e7fb4c417c9b188/gistfile1.txt

Step Five: Use Boxstarter to provision the server

$cred=Get-Credential AzureAdmin
Enable-BoxstarterVM -provider Azure -CloudServiceName BoxstarterTest1 `
  -VMName MyVM -Credential $cred –CheckpointName Fresh | 
    Install-BoxstarterPackage `
     -PackageName https://gist.github.com/mwrock/8518683/raw/43ab568ff32629b278cfa8ab3e7fb4c417c9b188/gistfile1.txt

This creates a connection to the VM and runs the installation script on that server. This may take a little time and is likely to include at least one reboot.

Step Six: Create a new Azure endpoint for the Minecraft port

$vm = Get-AzureVM -ServiceName BoxstarterTest1 -Name MyVM
Add-AzureEndpoint -Name Minecraft -Protocol tcp -LocalPort 25565 -PublicPort 25565 -VM $vm | 
  Update-AzureVM

This is necessary so that traffic can be properly routed to our server.

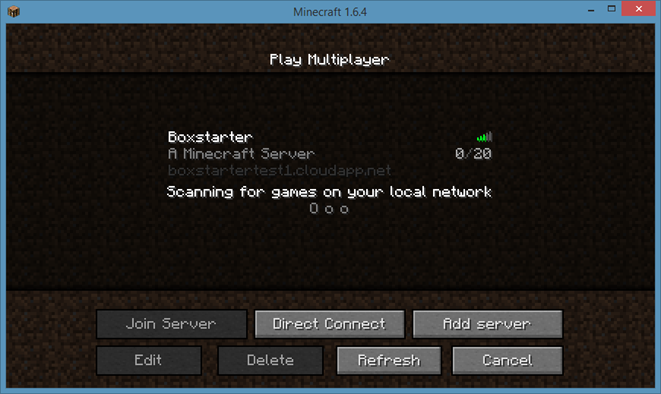
Thats it, fire up Minecraft and connect to our server.

image

Other new features worth mentioning

Enable-MicrosoftUpdate and Disable-MicrosoftUpdate

The credit to these new functions goes to Gary Ewan Park (@gep13) who contributed both. Thanks Gary!! This adds the ability for windows to update many Microsoft products beyond just windows. It essentially toggles this:

image


The Boxstarter Shell

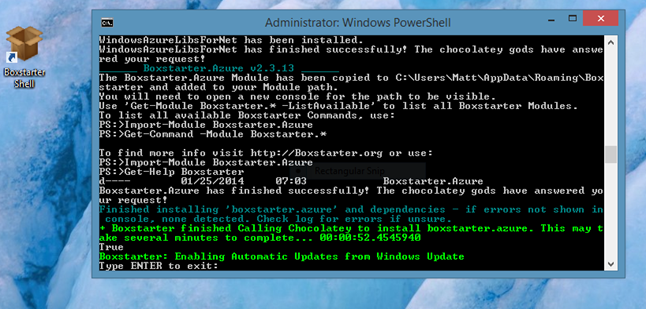
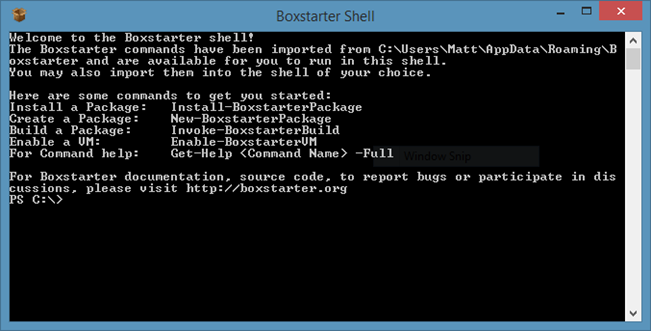
Especially if you are not comfortable with Windows PowerShell, you may prefer to use the Boxstarter Shell to run Boxstarter commands. The Boxstarter Shell will make sure that the user is running with administrative privileges, the execution policy is compatible and all Boxstarter PowerShell modules are loaded and accessible. This shell also prints some basic "Getting Started" text at startup to assist you in running your first commands.

Automate the Install and setup of a Team Foundation 2013 Server with Build services on a Azure VM with Boxstarter

$
0
0

tfsBoxLast week I released version 2.3 of Boxstarter which includes some Azure VM integration features to Boxstarter’s Chocolatey/Nuget Package management approach to Windows environment automation tools. I blogged about how one can use it to deploy and configure a publicly accessible Minecraft server. Well Minecraft might not be for everyone. Others might prefer a TFS 2013 server.

In this post we will install Boxstarter and the Windows Azure PowerShell tools, create a Windows Azure VM, and with a single command deploy a chocolatey package that will connect to our VM and install Sql Server 2012 Express with SP1, Team Foundation Server 2013 Express, configure the TFS server to connect to the database and create a default collection and also configure and start build services. You will then be able to launch a browser or Visual Studio and connect to your VM on port 8080 to access these services. Because the entire install and configuration is encapsulated in a Chocolatey package, you can repeat this on as many servers as you like again and again and again.

Azure is cool, but what about Hyper-V or “On Prem”

Definition: “On-Prem” is what the cool kids say when referring to On Premise installs or installations that runs on hardware which resides in your own data center.

In case you are not interested in deploying TFS on an Azure VM, I will also show you how you can apply the install package to an on prem server or a Hyper-V VM toward the later end of this post.

Chocolatey? Sounds yummy. What is it?

You are correct. It is yummy, but its not the kind of chocolate you are probably thinking of. Unless of course you are thinking of the chocolate that can install Visual Studio, Office 365, ITunes and over 1500 other applications in a single command. Next…next…finish? C’mon, what are you? a Farmer? Uhh…well if you are the guy who runs the entire TFS team (AKA Brian Harry), then maybe you are.

Chocolatey leverages Nuget packaging technology and standards to automate the installation of machine applications. While typical Nuget packages componentize code libraries that can easily be consumed by Visual Studio, Chocolatey packages make the command line installation of applications a simple and repeatable operation. Furthermore you can compose these packages to build out everything a server needs. The packages are entirely Powershell based so anything that you can do in Powershell (in other words, pretty much anything) can be captured in a package.

What does Boxstarter add?

Boxstarter provides an environment for running Chocolatey packages that can handle reboots, remote installations, windows specific settings and Windows Update control and several other features. Boxstarter takes Chocolatey and targets its use specifically for scenarios involving the setup of a Windows environment from scratch. You can check out this page on the Boxstarter.org site for details on Boxstarter specific features.

Preparing your deployment environment

Before you can begin actually deploying your Chocolatey package to build your TFS Server, we will install the Boxstarter core modules and its Boxstarter.Azure module and configure our Azure subscription account to be managed by the Windows Azure Powershell toolkit. This is a one time step that should only need to be performed once on an individual machine that uses Boxstarter.

PREREQUISITES: There are two key prerequisites to running the software and commands in this tutorial:

  • Powershell V 3 or higher. This ships with Windows 8/2012 and higher. Windows 7 and server 2008 R2 can be upgraded with the latest Windows Management Framework.
  • A Windows Azure subscription. Trying to add a VM without an Azure subscription will only end in disappointment. Don’t be disappointed. Get an Azure subscription instead! If you have an MSDN subscription, you can get one for FREEEEEE!!!

Getting Boxstarter

Getting Boxstarter is easy especially since you can get Boxstarter with Boxstarter. If you do not already have Chocolatey installed (if you do, just CINST Boxstarter.Azure), this is a no brainer. Simply direct IE, or any browser that supports click once apps, to http://boxstarter.org/package/nr/Boxstarter.Azure. This invokes a Click Once app that will bootstrap Chocolatey and install all Boxstarter modules including the new Boxstarter.Azure module. As I already mentioned, this is all built on top of Nuget packaging which supports package dependencies. So along with the Boxstarter.Azure package, the Windows Azure .Net libraries and Windows Azure Powershell tools will be downloaded and installed. If you do not have the .Net 4.5 framework, you get that too.

launchendNote that the /nr/ in the URL you used to kick off the Boxstarter install tells Boxstarter not to reboot your machine. Without that, if Boxstarter detects a pending reboot at any time during the install, it will reboot, and automatically log you back in and restart the install. Any install packages already installed will be skipped. Most Boxstarter packages and prerequisites should not require a reboot to run however the .Net framework version 4.5 may be an exception. So if you do not have that, you may want to remove the /nr/ from the above URL or you can manually rerun the install if you receive an error during the install.

The Boxstarter Shell

While you can use any PowerShell console to load the Boxstarter modules and run its commands (see this page for details on running Boxstarter commands), launching the Boxstarter Shell shortcut ensures that all modules are loaded and prints some “getting started” text when the shell first loads.

shell 

Due to the improved module auto loading in PowerShell version 3, this is not as much of an issue as it is in PowerShell 2 environments (which are not supported for the Azure integration features in Boxstarter). That said, if you are not familiar with PowerShell and want to use Boxstarter’s core commands in a PowerShell 2 environment, you may find using the Boxstarter Shell to provide a better experience.

Importing your Azure subscription details

Before you can create VMs or interact at all with your subscription resources via the Azure PowerShell commands, you need to import your Azure subscription and authentication certificate so that the Powershell commands can properly associate you with your account. The easiest way to establish this association is by running:

Get-AzurePublishSettingsFile

This will launch your default browser and assuming that you have not recently logged into the Azure management portal, you will find yourself at a Microsoft Account login screen. Once you successfully authenticate with your account, your publisher settings file will begin downloading.

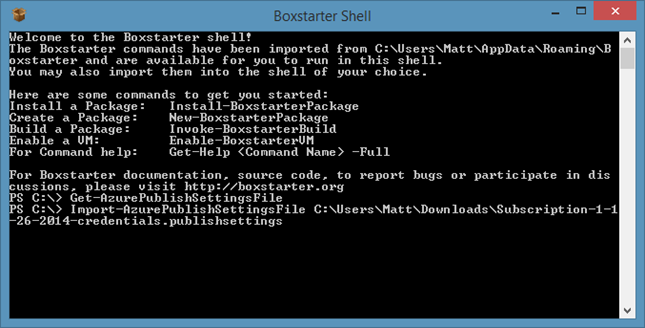
publishChoose to Save these settings. Then after the download completes, click the “Open Folder” link and note the location where the recently downloaded publish settings file was saved. Then run Import-AzurePublishSettingsFile and pass the path of the file. My import command looks like this:

import


The final step to get all of your subscription settings properly configured is to set the Storage  Account to be used for all operations invoked with the Azure Powershell tools which Boxstarter uses to access your VM. If you already have a Azure VM you plan to use for your TFS server, Boxstarter can set this on its own, but we are going to assume that is not the case and create a new VM. So we will need to set this value. To find all of your current Storage accounts, if any, run:

PS C:\> Get-AzureStorageAccount

StorageAccountDescription : Implicitly created storage service
AffinityGroup             :
Location                  : West US
GeoReplicationEnabled     : True
GeoPrimaryLocation        : West US
GeoSecondaryLocation      : East US
Label                     : portalvhdslwf0p2qrfyt34
StorageAccountStatus      : Created
StatusOfPrimary           :
StatusOfSecondary         :
...

This is a snippet of the first of my storage accounts which is the one I will use. So I now run:

Set-AzureSubscription -SubscriptionName Subscription-1 `
  -CurrentStorageAccountName portalvhdslwf0p2qrfyt34

Subscription-1 is the name of my subscription. Creative I know. If you do not have a storage account, you can create one either using the Azure Powershell commands or using the Azure management portal. Using PowerShell, one can create a new account using:

New-AzureStorageAccount -StorageAccountName newaccount -Location "West US"

One detail not to be missed here is that the StorageAccountName must be only lowercase letters or numbers. The Location must be a valid Azure data center location. You can find all of them using the Get-AzureLocation command.

Understand that everything we have done up until now has been a one time setup process that we should not need to repeat on the same machine if you plan to use Boxstarter again.

Creating the Azure VM

You can create an Azure VM in a single command. We will use the New-AzureQuickVM command. Since this command expects an Admin user name and password and we will need these same credentials when provisioning the VM with Boxstarter, we will store the credentials once in a variable:

$secpasswd = ConvertTo-SecureString "1276Tfs!" -AsPlainText -Force
$cred=New-Object System.Management.Automation.PSCredential ("TfsAdmin", $secpasswd) 

Now lets create the VM:

New-AzureQuickVM -ServiceName MyTfsVMService -Windows -Name tfs1 `
  -ImageName 3a50f22b388a4ff7ab41029918570fa6__Windows-Server-2012-Essentials-20131217-enus `
  -Password $cred.GetNetworkCredential().Password -AdminUsername $cred.UserName `
  -InstanceSize Medium -Location "West US"–WaitForBoot

This will create a new VM named tfs1 and since I do not have an Azure Cloud Service named MyTfsVMService, it will also create a new Cloud Service in which the VM will run. You can run multiple VMs in a single cloud service. Note that the cloud service name must be unique not only to your account but to all azure. This is because the service name forms the DNS name by which the VMs are reached. All VMs created inside of MyTfsVMService will be accessed via MyTfsVMService.Cloudapp.net. Multiple VMs are accessed through a different port. Of course now that I have created the service, you may not reuse the name unless I delete it, which I will likely do very soon. If you have an existing cloud service that you would like to reuse, you may specify that service. If you do, make sure to omit the -Location argument since the VM will use the location assigned to the service. Finally, if you are supplying a brand new service, use the same Location as the one used by the Storage account you chose above.

A couple other things to point out here. For our TFS server, specify an instance size of AT LEAST Medium. While I tend to use smaller VMs for my personal use, with TFS and SQL Server together, you are likely to have a much better trial experience with the Medium size with 3.5GB of ram as opposed to 1.75 in the Small sized instances. Of course you pay more for the larger VMs. This is one reason we are using a Windows Server 2012 R2 image as opposed to an image prebuilt with Sql Server. Since the Sql Server image costs include the additional SQL licensing costs, they are considerably more expensive. We will be installing the Sql Express SKU which will be quite sufficient for out purposes (and free). Furthermore, the Server 2012 R2 images, according to the current Azure pricing information as of this post is provided at the lower Linux rates.

Since we specified the –WaitForBoot argument, the command will not complete until our VM has completed its build cycle and is ready for connections….Oh look!…Its ready!

image

Provisioning with Boxstarter

Now that we have our VM, the next logical thing to do is install our software. So what does that look like with Chocolatey packages run through Boxstarter?

Package Composition

There are several ways to approach package creation. There is a page devoted to this topic in the Boxstarter documentation. Boxstarter provides some convenient commands to make package creation easy and sometimes altogether unnecessary.  We will use a Github Gist to compose the package script. So the next logical question is “What is a package and what can/should we include in the script?”

As already stated, Chocolatey packages are based on and completely comply with the Nuget packaging specification. In the common Chocolatey scenario, the package consists of two files:

  • A Nuspec file which is an XML formated manifest with metadata describing the package. This includes key things like the package name, its version, what other packages it depends on and what files are included. There is more but this covers the basics.
  • The ChocolateyInstall file. This is a PowerShell (.ps1) file that actually performs the installation. The beauty of this file is that it can contain absolutely any valid Powershell which gives us a lot of flexibility and power. When this script is executed inside of Chocolatey, it has access to the many commands that Chocolatey exposes to cover lots of common install scenarios like downloading, unzipping, and silently installing MSI files. There are commands for creating shortcuts, installing windows features, and more. When running with Boxstarter, there are even more commands covering scenarios around initial environment setup such as installing critical Windows updates.

You can supply more files. For example there may be config files specific to the applications you are installing that you might want to include in the package. All files in the package are zipped up into a single .nupkg file. This is the file that the underlying Nuget infrastructure unpacks.

Lets take a look at what our ChocolateyInstall script looks like:

cinst VisualStudioTeamFoundationServerExpress2013
cinst MsSqlServer2012Express

$tfsConfig="$env:ProgramFiles\Microsoft Team Foundation Server 12.0\Tools\TfsConfig.exe"
.$tfsConfig unattend /configure /type:standard
.$tfsConfig unattend /configure /type:build `
  /inputs:collectionurl=http://localhost:8080/tfs`;ServiceAccountName="LOCAL SERVICE"`;ServiceAccountPassword="pass"

This uses the Chocolatey Install command CINST to first install two packages: TFS 2013 Express and SqlServer 2012 Express. Both of these packages have their own dependencies. Sql depends on the .Net framework version 3.5 and TFS depends on version 4.5. Since we are installing on to Windows Server 2012 R2, we already have .Net 4.5 but R2 does not come preinstalled with v. 3.5 so that will be installed as well.

Once these are installed we will configure TFS with a standard server configuration. This will use the local default named sql instance for the TFS configuration and collection databases and create both of them. That creates a server capable of hosting source control and work item tracking. Next we configure Build services so that now we can add Build controllers, agents and Build definitions to be executed.

Our goal is that when these commands complete, we can navigate to http://MyTfsVMService.CloudApp.net:8080/tfs from our local machine and see the web portal of our TFS collection.

Package Consumption

So how do we package up this script so that we can execute it and configure our VM? One answer is: we don’t need to. Boxstarter can take a file path or http URL and as long as they resolve to a raw text resource, Boxstarter will convert them to a temporary package and run them. This is very convenient for one off installs where you do not want to go through the trouble of composing a manifest and packaging process. Not that it is so onerous of a process. The down side to this approach is that if you plan to consume the same package again and again, a raw gist URL is very awkward to type and nearly impossible to memorize.

Lets say that we intend to use this package repeatedly and therefore want to invoke the package using a reasonably short and easy to remember label. Boxstarter provides a command that can create a minimal package from our gist.

New-PackageFromScript `
  -Source https://gist.github.com/mwrock/8576155/raw/3edd9c39bed40b2398e6158062a1e05f4b4c5dff/gistfile1.ps1 `
  -PackageName TfsServerWithBuild

This just created a TfsServerWithBuild.1.0.0.nupkg file in our “local package repository”. This is a special location on disk that Boxstarter looks for packages before attempting to fetch the package from a remote nuget feed. By default this is a folder in the same directory where the Boxstarter modules live, but you can configure Boxstarter to store them elsewhere. The local repo is great for personal use but cant likely be accessed let alone discovered by others. The best way to share your package with others is to publish the package to a feed.

Package Publishing

There are multiple options when it comes to publishing your package. If you think that the package provides value to a broad range of users and include those outside of your organization, the Chocolatey.org feed is likely the best place. If fact this is where the TFS and SqlServer packages reside that our package will install. If the package likely only has value for yourself or your own organization, then a feed provider like MyGet.org works great. You can create one or more of your own feeds on Myget. These can even be private and require authentication which is desirable especially when there is sensitive information contained inside of your package.

I’m going to publish this package to a Boxstarter Community feed on Myget.org.  By default, Boxstarter will include this feed in the feeds it scans to find packages. Here is how we publish:

PS C:\> ."$env:ChocolateyInstall\ChocolateyInstall\nuget" push C:\Users\Matt\App
Data\Roaming\Boxstarter\BuildPackages\TfsServerWithBuild.1.0.0.nupkg <My Own KEY> -Source https://www.myget.org/F/boxstarter/api/v2/pack
age
Pushing TfsServerWithBuild 1.0.0 to 'https://www.myget.org/F/boxstarter/api/v2/p
ackage'...
Your package was pushed.
PS C:\>

Note that as with any Nuget based package feed, you always push using an API key that identifies you as the publisher. You can sign up for a free personal account at Myget and do not have to pay for creating and publishing to feeds. Here we see our feed show up:image

Installing the Package

Finally we are ready to kick off our install. Here it goes:

PS C:\> Enable-BoxstarterVM -Provider azure -CloudServiceName MyTfsVMService -VM
Name tfs1 -Credential $cred -CheckpointName BareOS | Install-BoxstarterPackage -
PackageName TfsServerWithBuild
Boxstarter: Locating Azure VM tfs1...
Boxstarter: Installing WinRM Certificate
Boxstarter: Configuring local Powershell Remoting settings...

Powershell remoting is not enabled locally. Should Boxstarter enable powershell
 remoting?
Powershell remoting is not enabled locally. Should Boxstarter enable powershell
 remoting?
[Y] Yes  [N] No  [?] Help (defaultis"Y"):
Boxstarter: Enabling Powershell Remoting on local machine
Boxstarter: Testing remoting access on mytfsvmservice.cloudapp.net...
Boxstarter: Creating Checkpoint BareOS for service MyTfsVMService VM tfs1 at


Here we see the beginning of the Boxstarter output. We are issuing two commands really – piping one to the other. The Enable-BoxstarterVM performs a VM specific implementation for finding the DNS name and WinRM port for connecting to the VM. It may also do some prep work to ensure that a connection can be made. In Azure’s case, this includes downloading the certificate from the VM and installing it into our root certificate store so that we can communicate with the VM using HTTPS, which is the protocol powershell remoting is using here.

VM Checkpoints

Also note that just before the install begins, a checkpoint is taken that we label “BareOS.” This is optional but convenient in the event something goes wrong with our package as a result of a mistake in our authoring. We can then Restore this checkpoint, fix the package and retry from the exact same state we had when we began without needing to wipe out and create a new VM. You will not find these Checkpoints in the Azure management portal. Boxstarter uses Azure Blob Snapshots to create an implementation of checkpoints similar to what you would find in Hyper-V or other VM technologies.

If the BareOS checkpoint already existed when we ran our command, instead of creating the checkpoint, Boxstarter would have restored it. So if we were to run the above command without any changes all over again, our VM would be restored to its original state first.

Boxstarter exposes some additional commands for listing, creating, restoring and deleting checkpoints. You can check out the Boxstarter Azure documentation for details.

ProTip #1: Substitute “HyperV“ for the “Azure” provider argument and remove the CloudServiceName argument and Boxstarter would look for a Hyper-V VM named tfs1 and provision it. With Hyper-V, Boxstarter may mount the VM’s VHD file to configure it for remote connectivity. That’s often not necessary.

You don’t think you could run this in a Hyper-V VM because you would need another Windows Server licence? Not true. You can get evaluation VHDs for free and they can legally be “reevaluated.” See my blog on the Boxstarter Hyper-V functionality that touches on this point and where you can find them.

Adding an Endpoint for port 8080

By default, TFS listens on port 8080 for requests to its web services. We need to provide an endpoint to our Azure Service that will forward all 8080 traffic to the same port on our VM. By default, when you create a new VM in Azure, it will automatically create endpoints for Remote Desktop and PowerShell remoting. Adding an endpoint is fairly straight forward. Here is the command we will use:

$vm = Get-AzureVM -ServiceName MyTfsVMService -Name tfs1
Add-AzureEndpoint -Name tfs -Protocol tcp -LocalPort 8080 -PublicPort 8080 -VM $vm | 
  Update-AzureVM

Lets check out or new TFS server

First lets take a look at the last bit of Boxstarter output:

Errors       : {}
ComputerName : mytfsvmservice.cloudapp.net
Completed    : True
FinishTime   : 1/26/2014 12:18:04 AM
StartTime    : 1/25/2014 11:47:21 PM

This is exactly what we want to see. Our installation completed with no errors. This means no exceptions were thrown and the final Exit Code was 0.

So lets see if we can create a new project in Visual Studio.

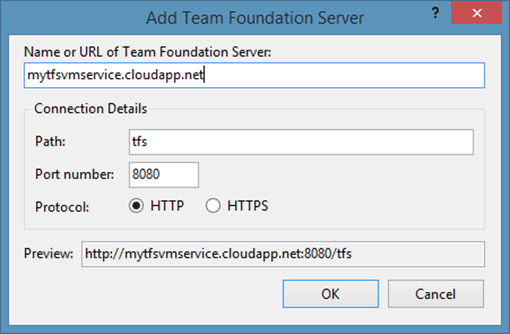
First we need to connect to our server:

image

You will be prompted for a user name and password. Provide the same credentials that you provided earlier when creating the VM admin account. Now lets create a new project:

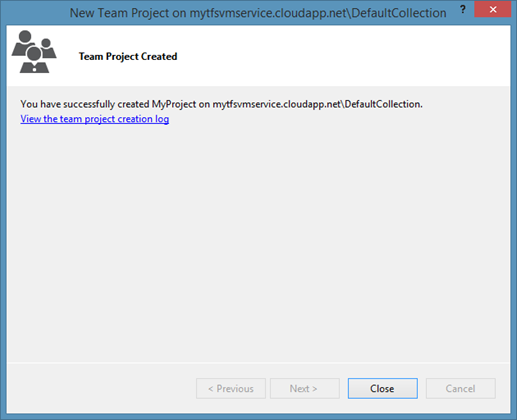
image

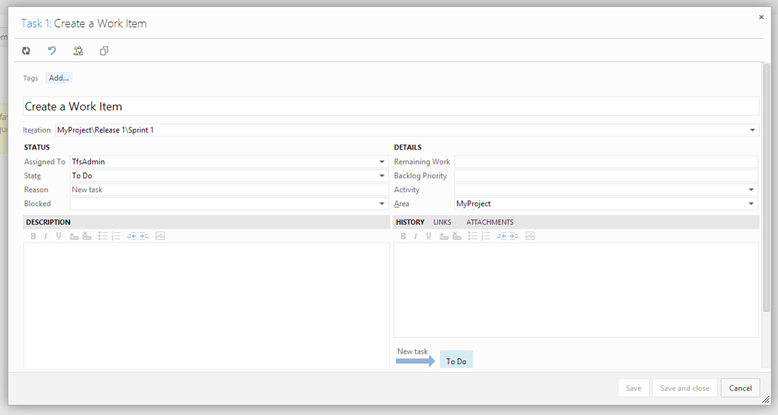
Looks good so far. Now lets go to the web portal and create a work item.

image

Now THAT is a work item.

On Premise Install (aka physical machine install)

Boxstarter can install anywhere. We just saw Boxstarter work on an Azure VM and I mentioned how to accomplish the same with Hyper-V.  As long as Powershell Remoting or at least remote WMI is enabled on a machine, the Boxstarer user has admin rights and its available on the network, Boxstarter can be used to provision any physical or virtual machine using Install-BoxstarterPackage:

Install-BoxstarterPackage -ComputerName MyMachine.MyDomain.com -Credential $creds -PackageName MyPackage


If you are actually on the local machine, just as we did at the beginning of this post to install the Boxstarter modules, you can use the click-once launcher from IE or any Click-Once enabled browser (extensions exist for both Chrome and Firefox). If your default browser can run click-once apps, you can even launch the installer from a command line:

START http://boxstarter.org/package/MyPackage

Released Boxstarter v2.4: Test Runner for Chocolatey Packages and many more Windows GUI configuration functions

$
0
0

boxLogoCheckThis week I released Boxstarter version 2.4. This release introduces a new feature for testing packages, the addition of many more Windows GUI configuration functions and several bug fixes and minor enhancements.

Windows GUI Configuration Functions

Boxstarter gives great thanks to Gary Park (@gep13) who provided the pull requests delivering these functions. These are a great addition to the value provided by Boxstarter to script your box so that it not only has what you want but also looks just the way you want it. Its not always easy to remember where to right click or how to “swipe” to find the settings that make your environment the most productive place for you to get things done. Here is a list of the new functions:

  • Enable/Disable showing charms when mouse is in the upper right corner
  • Enable/Disable switching apps when pointing in the upper left corner
  • Enable/Disable the option to launch powershell from win-x
  • Enable/Disable boot to desktop
  • Enable/Disable desktop background on the start screen
  • Enable/Disable showing the start screen on the active display
  • Enable/Disable showing the Apps View by default on the start screen
  • Enable/Disable searching everywhere in apps view. Not just apps.
  • Enable/Disable showing desktop apps first in results
  • Lock/Unlock task bar
  • Change taskbar icon size
  • Change location of taskbar docking

You can find the exact function names and syntax examples here.

Testing Packages and Continuous Package Delivery

A new Boxstarter module has been added, Boxstarter.TestRunner, that can test either specific packages or all packages in a repository that have versions greater than what is published. Boxstarter can be configured to test these packages on one or more “deployment targets” to determine if the package installs are successful. Boxstarter can also be configured to publish a package to its feed if it installed successfully on all deployment targets.

The Boxstarter.TestRunner module includes some powershell scripts and an MSBuild project file that can be used to integrate with modern build servers enabling scenarios where newly committed packages and package changes are automatically tested and published. They can be tested on multiple targets perhaps with different versions of windows and all of this can be done in the cloud. If testing on Azure VMs, Boxstarter can shutdown the VMs when testing is complete so you only incur costs while tests are being performed.

Details on how to use the test runner both interactively and with different build server scenarios are documented here.

Personal Case Study using Visual Studio Online Build Services to detect changes and deploy to Azure VMs and finally publish to the public Chocolatey feed

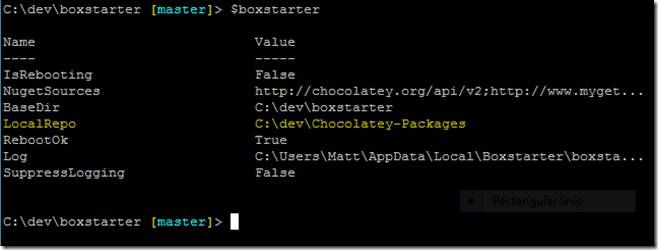
I have a git repository of almost 50 Chocolatey packages that I keep on Github. I have installed the Boxstarter.TestRunner module which is a separate install from the core set of Boxstarter modules. I have configured Boxstarter to point to my local copy of this repository:

image

I have also configured the Boxstarter.TestRunner’s deployment options to use both a windows 2012 and a 2008 R2 Azure VM for testing. Before each test, Boxstarter will snap the VMs to a preset checkpoint labeled TestReady that I created with the Boxstarter.Azure module.

image

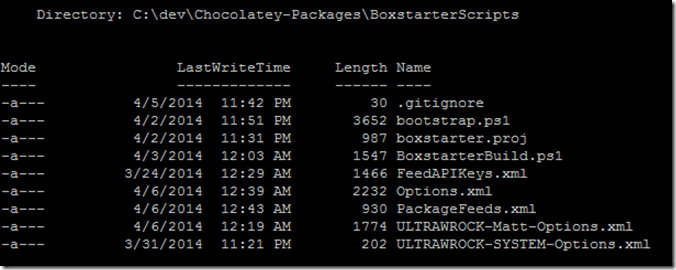
Furthermore I took an extra step of adding the Boxstarter.TestRunner build scripts to my repo using the Install-BoxstarterBuildScripts command which created a new folder in my repository to hold these scripts and persist my settings:

image

These files contain scripts that can bootstrap Boxstarter on a build server, test changed packages and publish successful packages. The xml files hold my options. Some of these, Boxstarter adds to my .gitignore file because they have VM credentials and Nuget API keys that I would not want kept in my public github repo.

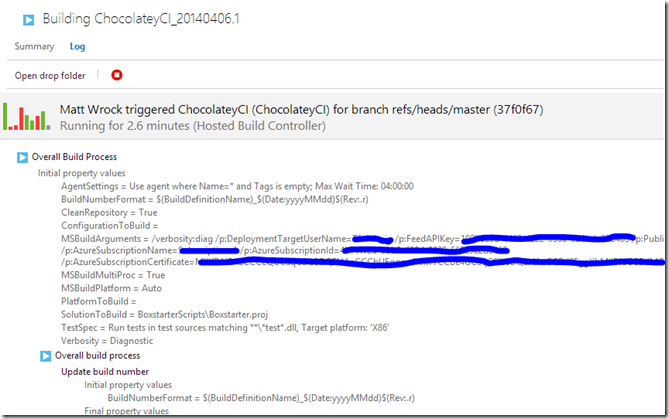
Earlier today I received a great Pull Request on three Visual Studio 2013 packages that allow for one to pass additional install arguments and a product key through the Chocolatey installer. I merged those in but before pushing to my github repository I pushed to a special Remote I keep at my VisualStudio.com account. Anyone can sign up for a VisualStudio.com account for free that supports a team of 5 or fewer members. This gets you private git or tfsvc repositories, work item tracking and a hosted build server. You can also pay for more team members and services. I have a CI build definition setup to build commits to this repository named ChocolateyCI. Almost immediately after my push, a build begins. This calls the Boxstarter.proj MSBuild files which runs BoxstarterBuild.ps1 to orchestrate the testing and publishing using the Boxstarter modules.image

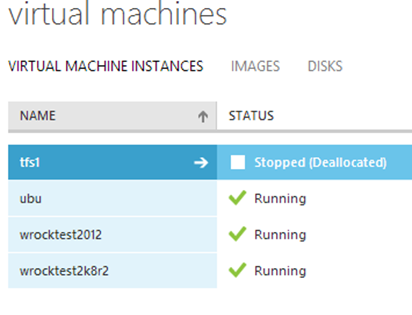
I have hidden it away but I have configured my Build Definition with all of the information it needs to establish a connection with my VMs using the Boxstarter.Azure module and run my packages on my VMs. I can see that my Azure VMs, wrocktest2012 and wrocktest2k8r2, have been fired up to test the committed changes:

image

Lets quietly sneak in to one of the VMs and just make sure they really are testing:

imageYep. They are diligently testing my packages.

Now unfortunately I can tell you right now that this build is doomed for failure. This is why: the Visual Studio Online hosted build controllers limit builds to an hour. I have 3 changed Visual Studio packages running sequentially on two small VM instances that have to restore their image before each test. That will certainly take longer than an hour. The hosted build solution is ideal for most packages but not multiple visual studio tests. That’s OK. I have other options. I have another VM that is a dedicated build server. I could push my repo to the remote watched by that server and my build can take as long as it needs. There are different configuration issues to take into consideration when working with a hosted build server like Visual Studio Online or your own private build server. These are documented on the Boxstarter.org doc pages.

For a faster and simpler option, I can test and publish locally on my local Hyper-V instances. That will be a lot faster because these VMs are beefier and the Hyper-V checkpoint restores are much faster than an Azure VM image blob restore. Even simpler, and Boxstarter’s default behavior, is to have one deployment target, localhost, and the package will be tested locally with reboots disabled. However, I already have Visual Studio 2013 installed locally and would rather test in a pristine, controlled environment.

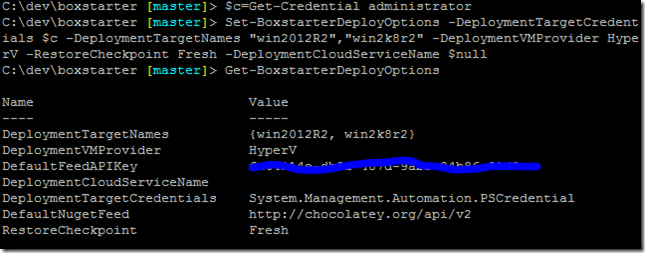
So I’ll adjust my Test Runner settings:

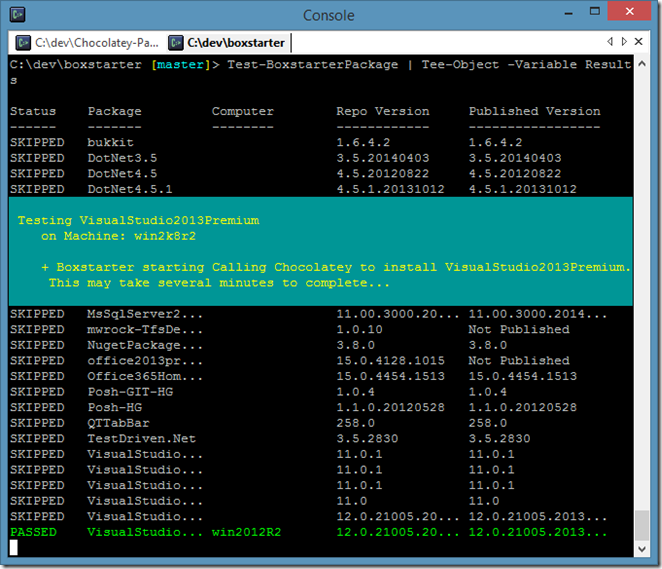
imageNow I’ll run the test interactively from my current shell. As the results run and complete, status is reported to my console:

image

Once the package tests have completed I see the results:

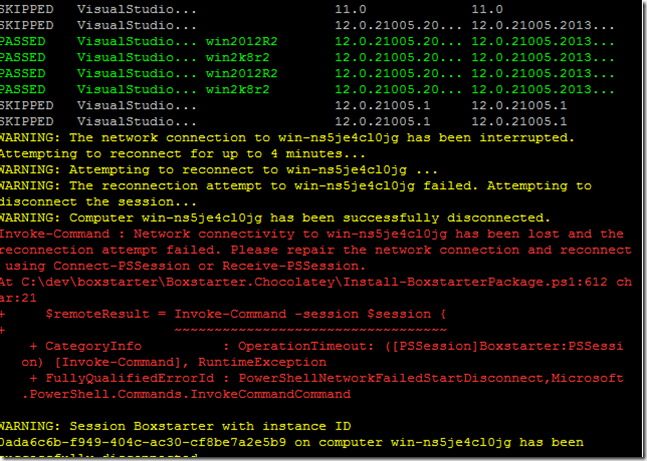
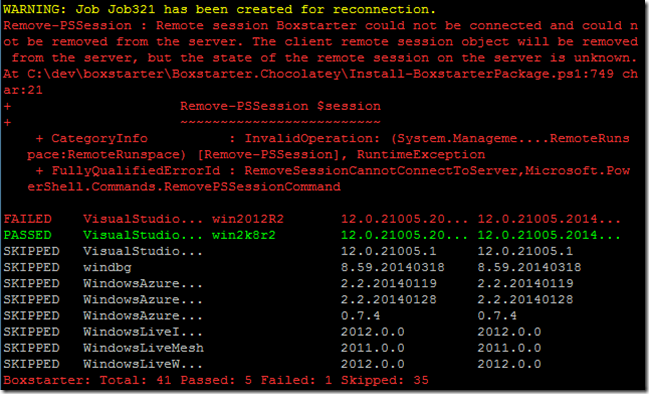
imageWhoa. What happened here? Well lets just say my daughter who makes a great Chaos Monkey decided to close the lid of my laptop (the VM host) cutting off network connectivity to the VMs. Fortunately, Boxstarter is able to recover upon opening the lid:

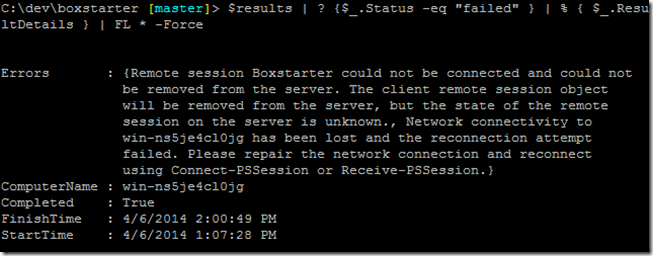
imageThe test that was interrupted likely succeeded in completing the installation. We can inspect the error details of the failure and do not see anything representing an error from the installer. If the installer returned a non 0 exit code, we would see it in the details.

imageI’m going to go ahead and publish the passed packages now. This publishes the two packages that passed on both test VMs.

imageAlso to be on the safe side, I’m going to go ahead and resubmit the failed package for testing. I just need to rerun the Test-BoxstarterPackage command. Since the other two packages were published, my remaining one package will be the only package with a version that is greater than its published version.

image

Other Changes in 2.4

There were several bug fixes in this release. Thanks to everyone who filed an issue! Also, these two enhancements were added:

  1. All calls to the Chocolatey installer (cinst) inside of a package now includes the local repository as a package source. This is handy when working with private feeds or debugging packages an you want the package to be installed from your local repository instead of the public Chocolatey feed.
  2. When invoking a package install targeting a remote machine, the current user does not need to ba an admin user on the deployment box. They do need to be admin on the deployment target. This was done to support deploying from a Visual Studio Online build server where the ientity controllin the build is not admin on the build server.

Please file issues if you observe any thing that does not seem right or if you would like to suggest new features. I’d love to know what you think would be a worthy addition to Boxstarter functionality.

Leaving Microsoft and Building a ‘DataCenterStarter’ for CenturyLink Cloud

$
0
0

As of last week I am no longer working at Microsoft. I worked at Microsoft for the last four and a half years and it was an amazing experience where I learned a lot from many very smart people. I am now a Software Engineer focusing on data center automation at CenturyLink Cloud.

What the heck did I do at Microsoft?

I came to Microsoft and the Pacific Northwest from Southern California where I had spent the previous 9 years working for an online advertising company starting as a front line web developer and eventually becoming VP of technology. I reached a point where I wanted a change and a return to hands on engineering. Having no formal computer engineering training and being almost exclusively exposed to “startup” shops, I really wanted to work for a major technology company to witness how a well established organization runs things. Well I definitely got what I was looking for and received exposure to some amazing people and practices.

At Microsoft, I started working on the Visual Studio Gallery and several other similar sites like the Technet script gallery and the MSDN Code Sample gallery as well as some of the “goo” that provided a unified experience for the Microsoft Forums, the galleries, search and profile pages on MSDN and Technet. Some of the greatest things I walked away with here was an engrained devotion to the practice of Test Driven Development and a great appreciation for not only the consumption but participation in Open Source Software projects.

In my free time I created an open source library that significantly improved our page load performance across the above sites as well as the msdn/technet blog and wiki platform. Later I worked on environment setup and deployment automation for these properties which inspired Boxstarter.org. The last 2 years were spent in the Visual Studio Cloud Services org within DevDiv where I worked on “Feature Flags” allowing us to deploy “hidden” features while they were in the middle of development, the back end for the new Charting features inside TFS Work Item Tracking and most recently deployment automation for Visual Studio Online.

A new chapter

Over the past couple of years, my “side project” Boxstarter has consumed a lot of my passion and has led me to develop some relationships in the DevOps community and learn of many disciplines and technologies that fascinate me. I love and have become somewhat consumed by automation.

So a little over a month ago I received a twitter DM from a previous colleague, Tim Shakarian, asking me if I would be interested in building a “DataCenterStarter” for CenturyLink’s recent cloud acquisition at Tier3. I read this having just returned from dinner with my friend Rob Reynolds and some other guys from Puppet Labs and Peter Pouliot who heads up Microsoft community development of Hyper-V integration in OpenStack. Everyone present shared the same passions for automation and I was especially inspired hearing Peter’s automation stories from his Novell days and recent work with organizations like CERN. So with these conversations fresh in my mind, I wondered what are these DataCenters Tim speaks of?

I really was not “on the market” looking to move from Microsoft. In fact my role had recently changed and there were some great opportunities ahead to bring my organization to an exciting new level of engineering efficiency, but I thought it would be foolish not to at least listen to what my friend Tim had to say. Well six weeks later here I am and I am totally excited to be working on data center automation for CenturyLink Cloud. I feel like a kid in a candy store beginning work on projects that give me the opportunity to build out automation at vast scale and help my team deliver an awesome cloud solution to our customers.

Its not easy leaving behind an organization like Microsoft. There are a lot of great people there and I will truly miss my free MSDN Ultimate subscription where I managed to consistently milk about 148 of my 150 dollar monthly spending allowance on Azure services (the same granted to any MSDN Ultimate subscriber). I think it may be a couple years before I fully process my experiences at Microsoft so please be on the lookout for my forthcoming graphic novel series, Razzle Dragon, that portrays in Japanese Manga style my stint as a Microsoft software engineer.

Peering into the future of windows automation testing with Chef, Vagrant and Test-Kitchen – Look mom, no SSH!

$
0
0
tablet_converge

Linux automation testing has been supported for a while now using many great tools like chef, puppet, Test-KitchenServerSpec, MiniTest, Bats, Vagrant, etc. If you were willing to install an SSH server on Windows, you could get most of these tools to work but if you wanted to stay “native” you were on your own.

Pictured above: Testing node convergence on an 8 inch tablet.

I’m not at all morally opposed to installing SSH on windows. I love SSH. We spoon regularly. But while SSH is “just there” on linux, it incurs an extra install step for windows that must either be done manually or included in initial provisioning or image creation. Also, for some windows-only shops, the unfamiliarity of SSH may add a layer of unwanted friction in an automation ecosystem where windows is often an after thought.

Well recent efforts to make Windows testing a first class experience are beginning to take shape. Its still early days and some of the bits are not yet “officially” released but are available to use by pulling the latest bits from source control. I know…I know…to many that will still spell “friction” in bold. However, I want to share that one can today test windows machine builds via winrm with no SSH server installed, and I also want to offer a glimpse to those who prefer to wait until everything is fully baked of what is to come, and inform you that the wheels are in motion so please keep abreast of these developments.

Note: I presented much of this material and several Boxstarter demos to the Philadelphia PowerShell User Group last week, the video is available here.

Its not automated until it is tested

I work for CenturyLink Cloud and infrastructure automation is front and center to our business. Like many shops, we have a mixed environment and central to our principals is the belief that testing our automation is just as important as building our automation. In fact they are not even two separate concepts. Untested automation is not finished being built. So I am going to share with you here how we test our Windows server infrastructure along with some other bits I have been working with on the side.

Vagrant

If you have not heard of Vagrant, just stop reading right now and mosey on over to http://vagrantup.com. Vagrant is a hypervisor agnostic way of spinning up and provisioning servers that is particularly suited for developing and testing. It completely abstracts both the VM infrastructure as well as many possible provisioning systems (chef, puppet, plain shell scripts, docker and many many more) so that one can provision and share the same machine among a team using different platforms.

To illustrate the usefulness here, where I work we have a diverse team where some prefer MACs, others work on Windows and others (like myself) run a Linux desktop. We use Chef to automate our infrastructure and anyone who needs to create or edit chef artifacts needs all sorts of dependencies installed with specific versions in order to be successful. Vagrant plays a key role here. Anyone can download our Ubuntu 12.04 base image via VirtualBox, VMWare or Hyper-V and then use its Chef provisioner plugin to build that image to a state that mirrors the one used by the entire team. all this is done by including a small file of metadata that serves as a pointer to here the base images can be found as well as the chef recipes. If this sounds interesting, again I refer you to Vagrant’s documentation for the details What I want to point out here is its windows support.

Added support for WinRM and Hyper-V

Until fairly recently, Vagrant only supported SSH as a transport mechanism to provision a VM. It also lacked official Hyper-V support as a VM provider. This changed in version 1.6 with a WinRM “Communicator” and a Hyper-V provider plugin included in the box. While I don’t really use Hyper-V at work, I have some windows based personal projects at home and I prefer to use Hyper-V. So I quickly tested out this new plugin and was happy to see it available. There are still some kinks in the current version but work is underway to improve the experience. I’m trying to to personally contribute to issues that are blocking my own work and a couple have been accepted into Vagrant Master. Overall that has been a lot of fun. Here are the issues that have come up for me:

  • Only .vhdx image files are supported and .vhd files cannot be imported. I hit a wall with this when trying to use the .vhd files freely available for testing here on Technet. I have since added a patch which has been accepted to fix this.
  • Generation 2 Hyper-V VMs are imported as Generation 1 VMs and fail to boot. Oddly, most .vhdx images tend to be generation 2. My PR for this issue was just accepted yesterday.
  • Synced folders over SMB (this is the norm for a windows host/windows guest setup) fail. I’m hoping my PR for this issue is accepted.

If these same issues become blockers for you, the first two can be immediately fixed by pulling the latest copy of Vagrant’s master branch and copying the lib and plugin directories onto the installed version and you are welcome to pull my smb_sync branch which includes all of the fixes:

git clone -b smb_sync https://github.com/mwrock/vagrant
copy-item -path vagrant\lib `  C:\HashiCorp\Vagrant\embedded\gems\gems\vagrant-1.6.3 `  -recurse -force
copy-item -path vagrant\plugins `  C:\HashiCorp\Vagrant\embedded\gems\gems\vagrant-1.6.3 `  -recurse -force

Having worked with Vagrant for the past few months, I’ve been finding myself wishing there was a remote powershell equivilent to the vagrant SSH command which drops you into an ssh session on the guest box. So today I banged out a first draft of a vagrant ps command that does just that and will submit once it is more polished. You can expect it to look like this:

C:\dev\vagrant\win8.1x64> vagrant ps
default: Creating powershell session to 192.168.1.14:5985
default: Username: vagrant
[192.168.1.14]: PS C:\Users\vagrant\Documents>

A base box for testing

I’ve been playing with creating windows vagrant boxes. Unfortunately for Hyper-V, the vagrant package command is not yet implemented so I have to “manually” create the base box. Perhaps I’ll work on an implementation for my next contribution. My Windows 2012R2 Hyper-V box requires all the above fixes to install without error. You could use this Vagrantfile to test:

# -*- mode: ruby -*-
# vi: set ft=ruby :

VAGRANTFILE_API_VERSION = "2"
Vagrant.configure(VAGRANTFILE_API_VERSION) do |config| 
  config.vm.box = "mwrock/Windows2012R2"
  config.vm.box_url = "https://vagrantcloud.com/mwrock/Windows2012R2/version/1/provider/hyperv.box"
  # Change "." below with your own folder you would like to sync
  config.vm.synced_folder ".", "/chocolateypackages", disabled: true
  config.vm.guest = :windows 
  config.vm.communicator = "winrm"
  config.winrm.username = "administrator"
  config.winrm.password = "Pass@word1"
end

Note here that you need to specify :windows as the guest. Vagrant will not infer that on its own nor will it assume you are using winrm if you are using a windows guest so make sure to add that to your boxes as well if you intend to use winrm.

Test-Kitchen

Test-Kitchen is a testing framework most often used for testing Chef recipes (hence – kitchen). However I understand it is also compatible with Puppet as well. Like many tools in this space such as Vagrant above, it is highly plugin driven. Test-Kitchen by itself doesn’t really do much. What Test-Kitchen brings to the table (Ha Ha! I said table. get it?) is the ability to bring together a provisioning configuration management system like Chef and Puppet, a myriad of different cloud and hypervisor platforms and several testing frameworks. In the end it will spin up a machine, run your provisioning code and then run your tests. Further you can integrate this in your builds providing quick feedback as to the quality of your automation upon committing changes.

“Official” support for windows guests coming soon

Currently the “official” release of Test-Kitchen does not support winrm and must go through SSH on windows. However, Salim Afiune (@afiune), a developer with Chef has been working on adding winrm support. I have plumbed this into our Windows testing at CenturyLink cloud and have also used it developing my Boxstarter cookbook, which allows one to embed boxstarter based powershell in a recipe and provides all the reboot resiliency and windows config functions available in Boxstarter core. Salim has also contributed corresponding changes to the vagrant and EC2 Test-Kitchen drivers.

At CenturyLink, we use vmware and a customized vsphere driver to test with Test-Kitchen. It was trivial to add support for Salim’s branch.. With the Boxstarter cookbook, I use his vagrant plugin without issue. According to this Chef blog post, all of this windows work will likely be pulled into the next release of Test-Kitchen.

But I just cant wait. I must try this today!

So for those interested in “kicking the tires” today, here is how you can install all the bits needed:

cinst chefdk
cinst vagrant

git clone -b transport https://github.com/afiune/test-kitchen
git clone -b transport https://github.com/mwrock/kitchen-vagrant 

copy-item test-kitchen\lib `
  C:\opscode\chefdk\embedded\apps\test-kitchen `   -recurse -force
copy-item test-kitchen\support `  C:\opscode\chefdk\embedded\apps\test-kitchen `  -recurse -force
copy-item -Path kitchen-vagrant\lib `   C:\opscode\chefdk\embedded\lib\ruby\gems\2.0.0\gems\kitchen-vagrant-0.15.0`  -recurse -force 

cd test-kitchen
gem build .\Test-kitchen.gemspec
chef gem install test-kitchen-1.3.0.gem

This will install the Chef Development Kit and vagrant via Chocolatey and I’m assuming you have chocolatey installed. Otherwise you can download these from their respective download pages here and here. Then it clones the winrm based test-kitchen and kitchen-vagrant projects and copies them over the current bits.

Note that my instructions here are assuming you are testing on Windows. However, the winrm functionality is most certainly capable of running on Linux as I do at work. If you were doing this on Linux, I’d suggest running bundle install and bundle exec instead of copying over the chef directories. However this has caused me too many problems on Windows to recommend to others and purely copying the bits has not caused me any problems.

Hyper-V

Now you can pull down the boxstarter cookbook to test from https://github.com/mwrock/boxstarter-cookbook. If you run Hyper-V, you will want to install my vagrant fixes according to the instructions above since the box inside the boxstarter cookbook’s kitchen config is on a vhd file. You can then simply navigate to the boxstarer cookbook directory and run:

kitchen test

This will build a win 2012 R2 box and install and test a very simple cookbook via Test-Kitchen.

Virtual Box

If you run VirtualBox, you will need to make a couple changes. Replace the VagrantfileWinrm.erb content with this:

# -*- mode: ruby -*-
# vi: set ft=ruby :

VAGRANTFILE_API_VERSION = "2"
Vagrant.configure(VAGRANTFILE_API_VERSION) do |config| 
  config.vm.box = "<%= config[:box] %>"
  config.vm.box_url = "<%= config[:box_url] %>"
  config.vm.guest = :windows 
  config.winrm.username = "vagrant"
  config.winrm.password = "vagrant"
  config.winrm.port = 55985
end

You would also replace the .kitchen.yml content with:

The test included in the boxstarter cookbook is not very interesting but illustrates that you can indeed run kitchen tests against windows machines with no ssh installed.

---
driver: 
  name: vagrant 

provisioner: 
  name: chef_zero 

platforms: 
  - name: windows-81 
    transport: 
      name: winrm 
      max_threads: 1 
    driver: 
      port: 55985 
      username: vagrant 
      password: vagrant 
      guest: :windows 
      box: mwrock/Windows8.1-amd64 vagrantfile_erb: VagrantfileWinrm.erb 
      box_url: https://wrock.blob.core.windows.net/vhds/win8.1-vbox-amd64.box 

suites: 
  - name: default
    run_list: 
      - recipe[boxstarter_test::simple] 
    attributes:

Looking at a more interesting ServerSpec test

For those reading who might want to see what a more interesting test would look like, lets take a look at this Chef recipe:

include_recipe 'boxstarter::default'

boxstarter "boxstarter run" do
  password 'Pass@word1'
  code <<-EOH
    Update-ExecutionPolicy Unrestricted
    Set-WindowsExplorerOptions -EnableShowHiddenFilesFoldersDrives `
      -EnableShowProtectedOSFiles -EnableShowFileExtensions 
    Enable-RemoteDesktop
    cinst console2
    cinst IIS-WebServerRole -source windowsfeatures

    #Install-WindowsUpdate -acceptEula
  EOH
end

This is a sample recipe I include with the Boxstarter cookbook but I have commented out the call that runs windows updates. This recipe will run the included Boxstarter resource and perform the following:

  • Update the powershell execution policy

  • Adjust the windows explorer settings

  • enable remote desktop

  • install the console2 command line console

  • Install IIS

Here is a test file that will check most of the items changed by the recipe:

require 'serverspec'

include Serverspec::Helper::Cmd
include Serverspec::Helper::Windows 

describe file('C:\\programdata\\chocolatey\\bin\\console.exe') do
  it { should be_file }
end

describe windows_feature('Web-Server') do
  it{ should be_installed.by("powershell") }
end

describe windows_registry_key(
  'HKEY_CURRENT_USER\Software\Microsoft\Windows\CurrentVersion\Explorer\advanced') do
  it { should have_property_value('Hidden', :type_dword,'1') }
end

describe command('Get-ExecutionPolicy') do
  it { should return_stdout 'Unrestricted'}
end

Serverspec provides a nice Ruby DSL for testing the state of a server. Although the test is pure ruby code, in most cases you don’t really need to know ruby. Familiarity with the cut and paste features will be very helpful so please review those as necessary.

The documentation on the ServerSpec.org page does a decent job of describing the different resources that can be tested. Above are just a few:  a file resource, windows feature resource, a windows registry resource and a command resource that you can use to issue any powershell necessary to test your server.

All of these tests, as we do at CenturyLink can be fed into a Continuous Integration server (Jenkins, TeamCity, TFS, etc.) to give your team speedy feedback on the state of your automation codebase.

I hope you find this helpful and I look forward to these features making it into the official vagrant and test-kitchen installs soon.


Running Ubuntu with DHCP on Hyper-V over WIFI

$
0
0
Our CenturyLink Cloud Chef workstation served from Vagrant on Hyper-V. Credit for the ascii art goes to Tim Shakarian (@tsh4k).

Our CenturyLink Cloud Chef workstation served from Vagrant on Hyper-V. Credit for the ascii art goes to Tim Shakarian (@tsh4k).

A few months back when I began doing a bunch of linux automation and was waiting for my company ordered machine to arrive, I was mostly working from my personal windows laptop and was fairly invested in Hyper-V as my hypervisor of choice. Both at work and at home I work off of a wireless connection. This has not been a problem running windows guests especially since windows 8.1. There were a few rough edges on windows 8 but those seem to have been smoothed over in 8.1.

So my first go of an Ubuntu 12.04 guest installed just fine and I could interact with it via a hyper-v console but I could not SSH to the guest. It was not being assigned an IP accessible from the outside.

I had difficulty finding good information about this on the net. This is probably because the scenario is not very popular. This issue does not occur if you are on a wired connection or if your guest is using a statically assigned IP. Anyhow, I thought I’d blog about the solution for the other five people who run into this.

Is only Ubuntu affected or are other linux distributions affected as well?

I’m not sure but it is very possible. Personally I ran into this on Ubuntu 12.04 and 14.04. I have found some reports that seem to indicate that this is due to some fundamental network configuration changes made to Ubuntu in v12. If you are experiencing similar symptoms under other distros or earlier Ubuntu versions, the solution reported here is certainly worth a shot and please comment if you can.

Why run linux on Hyper-V?

That’s a very fair question. It does seem that most folks running linux VMs on windows tend to use Virtual Box as their hypervisor. I’ve run Virtual Box quite a bit back on windows 7 and it worked great. Since Windows 8, hyper-v comes “in the box” on the professional and enterprise SKUs. I had become familiar with using hyper-v on windows server SKUs, liked it and also really liked the hyper-v powershell module that ships with powershell version 3 and above.

One thing to be aware of is that you cannot run Virtual Box and hyper-v concurrently on the same machine. However, there is a work around if you create a separate boot record for a “sans Hyper-V’' setup. Of coarse this means a reboot if you want to switch. More importantly though, I have found that if you later uninstall Virtual Box, your hyper-v install can become corrupted. This has happened to me twice. The first incident required a repave of my machine and the second I recovered from by restoring to a previous machine image. I don’t know…maybe I’m doing something wrong but that was my experience and hopefully your mileage will vary. Since I use hyper-v for some side projects, I prefer to keep Virtual Box off of my personal machine.

Use an internal virtual switch and enable internet connection sharing to its adapter

This, in short, is the solution. In other words, do not use an external switch. When you are on wifi, hyper-v will create a bridge between your wifi adapter and the adapter it creates for the external switch. I wont get into the details (because I do not know them), but the Ubuntu guest cannot obtain an IP from DHCP under this setup.

So if you do not have one already, create an internal virtual switch from the Hyper-V management interface.

You can keep your external one if you use it for other guests, they can coexist just fine. Configure your linux guest’s network adapter to use the internal switch.

Next go to the Networking and Sharing center and select Change adapter settings. Open the properties of the adapter supplying your internet. This will likely be your wifi adapter. However, if you already have and plan to keep an external switch, you will notice that the wifi adapter is bridged to a separate adapter named after your external switch. If that’s the case, that’s the adapter whose properties you want to select.

Once in the properties pane, select the “sharing” tab and check: Allow other network users to connect through this computer’s network connection.

 If you have ,multiple adapters that this adapter could possibly share with, there will be a drop down option to choose. You can only share with one. If you only have one (in this case the adapter assigned to the internal switch) then there will be no drop down.

That’s it. You may need to restart the networking service but after doing so, it should get an IP and you can SSH to the guest using that.

The only residual fallout from this setup, and you may experience this regardless is that sometimes moving to a different network may require resetting one or more of your adapters. For example if you transport your laptop from a work network to a home network. Again, you may experience this even without this setup or you may not experience it at all. Its been rather hit and miss for me but I seem to bump into this more often under this setup.

Dear VMWare, please give us nice things to automate the things

$
0
0

I’ve spent this week at VMWorld 2014 in San Francisco and have been exposed to a fair amount of VMWare news and products. One of my goals for the week was to talk to someone on the VMWare team about questions I have regarding their SDKs as well as to provide feedback regarding my own experiences working with their APIs. Yesterday I met with Brian Graf (@vTagion) during a “Meet the Experts” session. Brian has taken over Alan Renouf’s (@alanrenouf) previous role as technical marketing engineer focusing on automation. He was gracious enough to hear out some of my venting on this topic and asked that I follow up with an email so that he could direct these issues to the right folks in his organization. This blog post is intended to fill the role of that email in an internet indexible format.

I’m pretty new to VMWare. Having recently come from Microsoft, Hyper-V has been my primary virtualization tool. One of the attractions to my new job at CenturyLink Cloud was the opportunity to work with the VMWare APIs. I have many colleagues and acquaintances in the automation space who work almost exclusively with VMWare. VMWare has dominated the virtualization market since the beginning and I have been wanting for some time to get a better glimpse into their products and see what the hype was all about.

So for the last several months, I have been working closely with VMWare tools and APIs nearly all day every day. One of my key focus points has been developing the automation pipeline that CenturyLink Cloud uses to fire up new data centers and to bring existing datacenters under more highly automated management. This not only involves automating the build out of every server but automating the automation of those servers. That’s where me and VMWare hang out. We have been leveraging Chef and its new machine resource framework Chef Metal. So I have been doing a fair amount of Ruby development writing and refining a VSphere driver that serves as our bridge between VMWare VMs and Chef. This also includes code that ties into our testing framework and allows us to spin up VMs as new automation is committed to source control and then automatically tested to ensure what was meant to be automated is automated.

Not only am I new to VMWare, I’m also new to Ruby. For years and years I had been largely a C# developer and more recently with powershell over the last 5 years. So I may not be the most qualified voice to speak on behalf of the x-plat automation community, but I am a voice nonetheless and I have had the pleasure of interacting with several “Rubyists” and hearing their thoughts and observations on working with the VMWare APIs.

The VSphere SDK is wrought with friction

From what I can tell, there is absolutely no controversy here. Talk to any developer who has had to work with VMWare APIs around provisioning VMs and they are excited to not merely mention but pontificate upon the unfriendliness of these SDKs. I’m not talking about PowerCLI here -  more on that later but I am speaking of nearly all of the major programming language SDKs that sit on top of the VMWare SOAP service. One nice thing is that they all look nearly identical since they all sit on the same API therefore my criticism can be globally applicable. I have personally worked with the C# and mostly the Ruby based rbvmomi library.

One of the biggest pain points is the verbosity required to wire up a command. For example, to clone a VM there is quite a few configuration classes that  I have to instantiate and string together to feed into the CloneVM method. So CloneVM ends up being a very fat call but if anything goes wrong or I have not provided just the right value in one of the configuration classes, I may or may not get an actionable error message back and if not I may have to engage in quite a bit of trial and error to determine just where things went wrong. I think I understand the technical reasoning here and that this is attempting to keep the network chatter down, but frankly I don’t care. This is a solvable problem and it would be interesting to know if VMWare is looking to solve this.

Open Source solutions

I am not asking that VMWare feed me a better API. Especially in the Ruby community there are many quality developers more than willing to help. In fact a look over at github will reveal that there has been significant community effort and assistance here. 

Just use Fog

One option that many pursue in the Ruby space is using an API called Fog. This is an API that abstracts several of the popular (and not so popular) cloud and hypervisor solutions into a single API. In theory this means that I can code my infrastructure against VSphere but also leverage EC2. The API aggregates many of the underlying components that one expects to find in any of these environments like Machines, Networks, Storage, etc.

Of coarse the reality is that simply moving from one implementation to another never “just works.” Also the more you need to leverage the specific and unique strengths of one implementation, the more likely it is that you eventually need to “go native” and abandon fog. This was my fate and I also found the fog plugin model to be inherently flawed in that when I pull down the Fog ruby GEM, I had to pull down all plugin implementations built in making for a huge payload to download and install.

An apparent OSS cone of silence?

The core Ruby library, rbvmomi, the same library that Fog leverages has fairly recently been transferred to VMWare ownership. I’d be inclined to say that is a good thing. However it seems that VMWare is neither engaging with the developers trying to contribute to this library not are they releasing new bits to rubygems.org. Further, VMWare has been silent amidst requests to when a release can be expected. The last release was in December, 2013.

Unfortunately one pull request merged in January (8 months ago), has still not been released to RubyGems. This particular commit fixes a breaking change related to the popular Nokogiri library and this means that many need to pin their rbvmomi version to 1.5.5 released in 2012. Remember 2012? This not only shows a lack of desire to collaborate with and support their community but has an even more damaging effect of discouraging developers to contribute. Why would you want to contribute  to a dead repository?

I’m not saying that I believe VMWare has no interest in community collaboration and I fully appreciate the herculean effort sometimes needed to get a legal department in the company the size of VMWare to authorize this kind of collaboration but silence does not help and it is sending a bad message (well I guess no message really).

Engagement with the Ruby community is important

This community is likely small in comparison to VMWare’s bread and butter customers, but the world is changing. Ruby has an incredibly large stake in the configuration management space along with many other popular tools in the “devops” ecosystem. Puppet and Chef are both rooted in Ruby and as a Chef integrator, almost any integration between Chef and VSphere is written in Ruby. Another popular tool is Vagrant, any Vagrant plugin to support VSphere integration is going to leverage rbvmomi.

The industry is currently seeing a huge influx of involvement and interest with getting tools like these plugged into their infrastructures. I believe this will continue to become more popular and eventually those who use VMWare not because they “have to” may eventually opt for solutions that are more friendly to interact with.

Scant documentation

All of this is made worse by the fact that the documentation for the VSphere API is unacceptably sparse. VMWare does maintain a site that serves to document all of the objects, methods and properties exposed by their SDK. However these consist of one line descriptions with no in depth details or examples. Yes there is an active VMWare community but the resources they produce often do not suffice and may be difficult to find for more obscure issues.

PowerCLI is cool but it does not help me

The sense that I often get is that VMWare is trying to answer these shortcomings with its PowerCLI API – a powershell based API that I do think is awesome. The PowerCLI has succeeded in making many of the operations that take several lines of ruby or C# into one liners and it comes with great command line help. In stark contrast to the other language SDKs, almost everyone raves over PowerCLI who is able to use it in their automation pipeline. However, this is not an answer and especially so if you run either a linux or a mixed linux/windows shop (ie most people).

At Centurylink Cloud we run both windows and linux. We find that it is easiest to run all of our automation from linux as the control center to our pipeline. Its just not practical to provision a set of windows nodes to act as a gateway into VSphere. Therefore this means Power CLI is only available to me for one off scripts which is exactly what we need to automate away from.

While I’m at it, one small nit on PowerCLI. Its implementation as a powershell snapin as opposed to a module can make it more difficult to plug into existing powershell infrastructure. It’s a powershell v1 technology (we are coming up on v5) and while somewhat small, it is one of those things that can give the impression of an amateur effort. That said, PowerCLI is by no means amateur.

What am I suggesting?

First, let us know that you hear this and that you have a desire to move forward to help my community integrate with your technology. Respond to people commenting on your github repository. If you lack the legal approval to release contributions, designate one or more community members and transfer ownership to them allowing them to coordinate PRs and releases. This library is not contributing to VMWare IP its just a convenience layer sitting on top of your web services so this seems like a reasonable request. Let me also state what I don’t want. I do not want fancy GUIs or anything that waits for me to point and click. I’m working to automate every dark corner of our infrastructure so that we can survive.

Finally, I want to clarify this this post is not intended to insult anyone. My hope is that it serves as another data point to help you understand your customers and that you can consider as you plan future strategy. I’m sure there are many employees at VMWare that share my passion and want to make integration with other automation tools a better story. To those employees, I say fight fight fight and do not become complacent and you are really super cool and awesome for doing that.

Getting Ready…Troubleshooting unattended windows installation

$
0
0
ready.PNG

I install windows (and linux) A LOT in my role at CenturyLink Cloud automating our infrastructure rollout and management. Sometimes things go wrong. Usually if our provisioning code has been waiting for more than a few minutes for the machine to be reachable I know something is not right. So I might pop open a VMWare console and see this ever familiar screen. The windows installation is “Getting Ready.” That may fill one with the adrenaline of sweet anticipation but I know this only ends in disappointment. I can assure you that if windows is not ready now, it will never be ready. As in never, ever, ever ready.

In the past I have sat staring into the spinning circle of emptiness wondering what in gods name is windows doing. There are no error messages and usually nothing helpful in the VMWare events other than telling me that the OS customization has failed. Mmm…thanks. Sometimes after 5 or 15 minutes, the OS may come to life but often not in a state that our provisioning can connect to over winrm. I’m usually caught off guard by this since I have been spending the past several minutes in a very intense Vulcan mind meld with my monitor. Hoping somehow to break through and thinking I’m just beginning to feel the silent, cold, lonely suffering of a failed domain join when suddenly I am asked to press ctrl+alt+delete. Well…ok…I will…and slowly, as if just awoken from one of those inception dreams within a dream within another dream and having aged hundreds of years, I type just that – ctrl+alt+delete.

OK. You got me. Ctrl+Alt+Del does not work in a VMWare console, but you get the idea. Anyhoo, I next run off to the event logs reading lot and lots of events that are entirely unhelpful and provide no clues. Usually this all ends up being some stupid error like providing a faulty domain admin password to the unattend file. Not too long ago we added code to our windows provisioning that adds a second NIC and that introduced a few issues leading to this phenomenon until I got the sequence just right of adding the NIC, disabling it, configuring it and enabling it. But a couple weeks ago I ran into a new issue that really stumped me and I was not able to solve by looking over my provisioning code or configuration data. This prompted me to research how to get to the bottom of what's going on when Windows is “Getting Ready.” In this post I will cover what I learned and hopefully reveal clues that can help others figure out how to get out of these installation hang-ups

Overview of CenturyLink Cloud’s server provisioning sequence

It may help to point out roughly how we go about installing our windows boxes. Our methods may be different from yours but that should be irrelevant and the techniques here to troubleshooting windows installation hangs and errors should be just as applicable to just about any unattended windows install. Our windows servers do run server 2012 R2 so older OSs may certainly be different.

We have been using chef for our server automation and, in particular, Chef-Metal for our provisioning process. We have written a custom Chef-Metal Vsphere driver that leverages the RBVMOMI ruby library to interact with the VMWare VSphere API that does all the footwork of going to the right host, cloning a initial VM template, hooking up the right data stores, setting up initial networking etc. This also calls into VMWare’s guest OS customization configuration which will produce a windows unattend.xml file. Also known as an answer file. The VMWare tools will inject this file into the setup which windows will then use to drive its installation.

Our unattend file ends up being pretty simple. It performs a domain join and runs some scripts that tweak winrm so our provisioner can talk to the machine, install the Chef client and kick-off the appropriate cookbooks and recipes making the machine a “real boy” in the end. We run a mix of windows and linux but everything goes through this same sequence but of coarse the linux boxes don’t have unattend.xml files generated but they do have their own OS customization process that configures initial networking.

If everything goes right. This takes about 5 minutes from the initial cloning until the machine can receive network traffic and begin its convergence to whatever role that machine will fill: web server, rabbitMQ server, CouchDB server, etc. It really doesn't matter if its windows or linux, 5 minutes is roughly the norm. BTW: for most of our automation testing of linux machines we use Docker which is nearly instantaneous but we do not use that in production (yet).

Breaking through Getting Ready

So what can one do when the windows install gets “stuck” in this Getting Ready state? Shift-F10 is your friend. I don’t think it matters what hypervisor infrastructure you are using or even if this is a bare metal install. We use VMWare but this should work on Hyper-V, VirtualBox, etc. Shift-F10 will immediately open a CMD.exe as administrator if typed during the unattended install phase.

From here you can start pouring through logs and can even open regedit and other gui based tools if necessary but this command prompt is usually enough to find out what is happening.

Where are the logs?

As I have stated above, I have personally not found the VMWare events or the machine event logs to be much help. Your mileage may vary but you are likely going to want to find the unattend activity log which is located, of course, in

c:\windows\panther\UnattendGC\setupact.log

I don’t know what Panther is. I like to think there was some MS windows team back in the early 90’s that called themselves the panther team pioneering the way forward in windows automation. I also like to think they used gang-like panther calls to communicate with one another when spotting each other in the cafeteria or the campus store. They may have worn special jackets with the wild face of a panther on the back and perhaps some had tattoos or some form of tribal scarification applied resembling panther like imagery. Who knows…I can only guess.

At least in my case this is where the answers were found. Certainly they will be here if the issue is related to the domain join which mine usually tend to be. If the authentication with the domain admin account is at fault, that should be clear here. For instance:

2014-09-06 22:30:10, Warning  [DJOIN.EXE] Unattended Join: NetJoinDomain attempt failed: 0x775, will retry in 10 seconds...
2014-09-06 22:30:20, Warning  [DJOIN.EXE] Unattended Join: NetJoinDomain attempt failed: 0x775, will retry in 10 seconds...
2014-09-06 22:30:30, Warning  [DJOIN.EXE] Unattended Join: NetJoinDomain attempt failed: 0x775, will retry in 10 seconds...
2014-09-06 22:30:40, Warning  [DJOIN.EXE] Unattended Join: NetJoinDomain attempt failed: 0x775, will retry in 10 seconds...
2014-09-06 22:30:51, Warning  [DJOIN.EXE] Unattended Join: NetJoinDomain attempt failed: 0x775, will retry in 10 seconds...
2014-09-06 22:31:01, Warning  [DJOIN.EXE] Unattended Join: NetJoinDomain attempt failed: 0x775, will retry in 10 seconds...
2014-09-06 22:31:11, Warning  [DJOIN.EXE] Unattended Join: NetJoinDomain attempt failed: 0x775, will retry in 10 seconds...
2014-09-06 22:31:22, Warning  [DJOIN.EXE] Unattended Join: NetJoinDomain attempt failed: 0x775, will retry in 10 seconds...
2014-09-06 22:31:32, Warning  [DJOIN.EXE] Unattended Join: NetJoinDomain attempt failed: 0x775, will retry in 10 seconds...
2014-09-06 22:31:42, Warning  [DJOIN.EXE] Unattended Join: NetJoinDomain attempt failed: 0x775, will retry in 10 seconds...

The key above is the hex error code. Given the nature of the hexadecimal numeric format, the root is often immediately obvious and if not a google search usually points you to a more specific message.

In my recent stump scenario, the issue was that the domain controller could not be found. It ended up that although I was explicitly giving the domain controller IPs as the DNS servers to use, I was assigning the machine IP via DHCP and the DHCP server pointed to a different pair of DNS servers. For whatever reason, windows was choosing to use those servers and therefore unable to resolve the domain name to its correct domain controllers. There is also many other non-domain join details to be found here as well.

Other log locations that may be helpful

If for whatever reason, the unattend activity log does not have helpful information, there are a few more places to look. All files and subdirectories under:

c:\windows\panther
c:\windows\debug
c:\windows\temp

If you too are using the VMWare tools to drive the OS customization, you will find logs specific to VMWare’s work in c:\windows\temp. Many of the logs in the directories mentioned above may duplicate one another but some may have more granular detail than others.

I certainly hope this helps. If it does and you so happen to spot me in a crowd, let out a wild panther shriek and I promise to return with the same.

Hurry up and wait! Tales from the desk of an automation engineer

$
0
0

I have never liked the title of my blog: “Matt Wrock’s software development blog.” Boring! Sure it says what it is but that’s no fun and not really my style. So the other week I was taking a walk in my former home town of San Francisco and it suddenly dawned on me “Hurry up and wait.” The clouds opened up, doves descended and a black horse crossed my path and broke the 9th seal…then the dove pooped on my shoulder which distracted me and I went on about my day. Later I recalled the original epiphany and decided to purchase the domain which I did last night and point it to this blog. I love the phrase. It immediately strikes the incongruous tone of an oxymoron but the careful observer quickly sees that it is actually sadly true and I think this truth is particularly poignant to one who spends large amounts of time in automation like myself.

A brief note on the .io TLD. Why did I register under .io? Well besides the fact the .com/.org were taken by domain parkers, my understanding is that the .io will allow my content to be more accessible to the young and hip. Why just look at my profile pic to the right and then switch to mattwrock.com and look again. The nose hairs are way sexier on the .io sight right?! Sorry ladies but I’m taken.

I digress..so before the press releases, media events and other fan fare that will inevitably follow this “rebranding” of my blog, I thought I’d take some time to reflect on this phrase and why I think it resonates with my career and favorite hobby.

What do you mean “wait”? Isn’t that contrary to automation?

Technically yes, but a quote from Star Trek comes to mind here: “The needs of the many outweigh the needs of the few.” It is the automation engineer who takes one for the team to sacrifice their own productivity so that others may have a better experience. Yes, always putting others before themselves is the way of the automation engineer. There is no ego here. There is no ‘I’ in automation. Oh wait…well…it’s a big word and there is only one at the end and its basically silent.

I could go on and on about this virtuous path (obviously) but at least my own experience has been that making things faster and removing those tedious steps takes a lot of effort, trial and error, testing and retesting, reverse engineering and can incur quite a bit of frustration. The fact of the matter is that automation often involves getting technology to behave in a way that is contrary to the original design and intent of the systems being automated. It may also mean using applications contrary to their “supported” path. In many scenarios we are really on our own and traveling upstream.

So much time, so little code

I’ve been writing code professionally for the past fifteen years. I’ve been focusing on automation for about the last three. One thing I have noticed is that emerging from solving a big problem I often have much less code to show for myself than I would in more “traditional” software problems. Most of the effort involves just figuring out HOW to do some something. There may be no or extremely scant documentation covering what we are trying to accomplish. A lot of the work involves the use of packet filters, and other tooling that can trace file activity, registry access or process activity and lots and lots of desperate deep sea google diving where we come up for air empty. When all is said and done we may have just a small script or simply a set of registry keys.

Congratulations! You have automated the thing! Now can you automate it again?

This heading could also be entitled so little code, so much testing but this one’s a bit more upbeat I think.

Another area that demands a lot of time from this corner of the engineering community is testing. Much of the whole point of what we do is about taking some small bit of code and packaging it up in such a way that is easily accessible and repeatable. This means testing it, reverting it (or not) and testing it again. The second point, reverting it (or not), is absolutely key. We need to know that it can be repeatedly successful from a known state and sometimes that it can be repeatable in the “post automation” state without failing. The fancy way to describe the later is idempotence.

Maybe I’m actually lucky enough to solve my problem quickly. I high five my coworker Drew Miller (@halfogre) but then he refuses to engage in the chest bumping and butt gyrating victory dance which to me seems a most natural celebration of this event. But alas…I wave good bye to sweet productivity as I wait for my clean windows image to restore itself, test it, watch it fail due to some transient network error, add the necessary retry logic and then watch it fail again because it cant be executed again in the state it left the machine. So there goes the rest of that day…

Why bother?

Good question. I have often asked myself the same. The obvious answer is that while automating a task may take 100x longer than the unautomated task itself, we are really saving ourselves and often many others from the death of 1000 cuts. The mathematicians out there will note the difference between the “100” and “1000” and correctly observe that one is ten times the other. Of course this ratio can fluctuate wildly and yes there are times when the effort to automate will never pay off. It is important, and sometimes very difficult, to recognize those cases especially for those ADD/OCD impaired like myself.

I have seen large teams under management that rewarded simply “getting product out the door” with the unfortunate byproduct of discouraging time devoted to engineering efficiencies. This is a very slippery slope. It starts off with a process that garners a bit of friction but through years of neglect becomes a behemoth of soul sucking drudgery inflicted on hundreds of developers as they struggle to build, run and promote their code through the development life cycle. Even sadder is that often those who have been around the longest and with the most clout have grown numb to the pain. Like a frog bathing in a pot of water slowly drawn to a boil, they fail to see their impending death, and they don’t understand outsiders that criticize their backwards processes. They explain it away as being too big or complex to be simplified. Then when it finally becomes obvious that the system must be “fixed” it is a huge undertaking involving many committees and lots of meetings. MMmmmmmmm…committees and meetings…my favorite.

The best part is its magic

But beyond the extreme negative case for automation portrayed above, there is a huge up side. I personally find it immensely rewarding to take a task that has been the source of much pain and suffering and watch the friction vanish. There is a magical sensation that comes when you press a button or type a simple command and then watch a series of operations unfold and then unfold again that once took a day to set up. I wont go into details on the sensation itself, this is after all a family blog.

Want to keep the best and recruit the best? Automate!

In the end, everyone wants to be productive. There is nothing worse than spending half a day or more fighting with build systems, virtualized environments and application setup as opposed to actually developing new features. Eventually teams inundated with these experiences find themselves fighting turnover and it becomes difficult to recruit quality talent. Who wants to work like this?

Wait a second…haven't I just been describing my job in a similar light? Fighting systems not meant to be automated and getting little perceived bang for my coding buck? Kind of, but these are actually two distinctly different pictures. One is trapped in an unfortunate destiny and the other assumes command over destiny at an earlier stage of suffering in efforts to banish it.

So what are you waiting for?…Hurry up and wait!

Using git to version stamp chef artifacts

$
0
0

This post is not about using git for source control. It assumes that you are already doing that. What I am going to discuss is a version numbering strategy that leverages the git log. The benefit here is the guarantee that any change in the artifact (cookbook, environment, data bag) will result in a unique version number that will not conflict with other versions provided by your fellow teammates. It ensures that deciding on what version to stamp your change is one thing you don’t need to think about. I'll close the post demonstrating how this can be automated as a part of your build process.

The strategy explained

You can use the git log command to list all commits applied to a directory or individual file in your repository:

git log --pretty=oneline some_directory/

This will list all commits within the some_directory directory in a single line per commit that prints the sha1 and the commit comment. To make this a version, you would count these lines:

powershell:
(git log --pretty=oneline some_directory/).count

bash:
git log --pretty=oneline some_directory/ | wc –l

Semantic versioning

If you are using semantic versioning to express version numbers, the commit count can be used to produce the build number – the third element of a version. So what about the major and minor numbers? One argument you can pass to git log is a starting ref from which to list commits. When you decide to increment the major or minor build number, you want to tag your repository with those numbers:

git tag 2.3

So now you want your build numbers to reset to 0 starting from the commit being tagged. You can do this by by telling git’s log command to list all commits from that tag forward like so:

git log 2.3.. --pretty=oneline some_directory/ 

If you were to run this just after tagging your repo with the major and minor versions, you would get 0 commits and thus the semantic version would be 2.3.0. So you will need to give thought to incrementing major and minor build number but the final element just happens upon commit.

Benefits and downsides to this strategy

Before getting into the details of applying this to chef artifacts, lets briefly examine some pros and cons of this technique.

Upsides

Any change to a versionable artifact will result in a unique build number and if two builds have the same contents, their build numbers will be the same

This is crucial especially if you need to communicate with customers or fellow team members regarding features or bugs. This can help to remove confusion and ensure you are discussing the same build. If you are using a bug tracking system, you will want to include this version in the bug report so other team members reviewing the bug can checkout that version from source control or review all changes made since that version was committed.

Builds can be produced independently of a separate build server

Especially for solo/side projects where you may not even have a build server, this can help you create deterministic build numbers. However even if your project’s authoritative builds are produced by a system like Jenkins or TeamCity, individual team members can produce their own builds and produce the same build numbers generated by your build server (assuming the build server is using this strategy). Of course the number may vary slightly if other team members have produced commits and have not yet pushed to your shared remote or if the build is performed without pulling the latest changes. That’s why you also want to include the current sha1 somewhere in your artifact. More on that later.

Allows you to separately version different artifacts in your repository

Especially if your chef repository houses multiple cookbooks and you freeze your cookbook versions or use version constraints in your environments, this can be very important. I want to know that any change to a cookbook will increment the version and if the cookbook has remained unchanged, its version should be the same.

Downsides

There will be gaps in your build numbers

You will likely commit several times between builds. So two subsequent builds with say 5 commits in between will increment the build number by 5. This should not be an issue as long as your team is aware of this. However, if you consider sequential build numbers important as a customer facing means to communicate change, this could be an issue. I have used this technique on a couple of fairly popular OSS projects and I never had an issue with users or contributors stumbling on this.

Build numbers can get big

If you rarely increment the major or minor build numbers, this will surely happen over time. I try to increment the minor number on any feature enhancing release in which case this is not usually an issue.

If build agents cannot talk to git

If you are using a centralized build server and if this is a collaborative project you certainly should be, you definitely want the builds produced by your build server to follow this same strategy. In order to do that, you want to configure your build server to delegate the git pull to the build agents. Otherwise, the git log commands will not work. The build agent must have an actual git repo with the .git folder available to see the commit counts.

Applying this to chef artifacts

First, what do I mean by “chef artifacts?” Don’t I really mean cookbooks? No. While cookbooks are certainly included and are the most important artifact to version, I also want to version environment and data_bag files. If I used roles, I would version those too. Regardless of the fact that cookbooks are the only entity that has first class versioning support on a chef server, I should be able to pin these artifacts to their specific git commit. Also, I may change environment or data_bag files several times before uploading to the server and I may want to choose a specific version to upload. If you add cookbook version constraints to your environments, any dependency change will result in a version bump to your environment and your environment version may serve as a top level repository version.

Stamping the artifact

So what gets stamped where? For cookbooks this is obvious. The version string in metadata.rb will have the generated version applied. For environment and data_bag files, we create a new json element in the document:

{  "name": "test",  "chef_type": "environment",  "json_class": "Chef::Environment",  "override_attributes": {    "environment_parent": "QA",    "version": "1.0.24",    "sha1": "c53bdaa92d67bea151928cdff10a8d5e634ec880"  },  "cookbook_versions": {    "apt": "2.6.0",    "build-essential": "2.0.6",    "chef-client": "3.7.0",    "chef_handler": "1.1.6",    "clc_library": "1.0.20",    "cron": "1.5.0",    "curl": "2.0.0",    "dmg": "2.2.0",    "git": "4.0.2",    "java": "1.28.0",    "logrotate": "1.7.0",    "ms_dotnet4": "1.0.2",    "newrelic": "2.0.0",    "platform_couchbase": "1.0.31",    "platform_elasticsearch": "1.0.40",    "platform_environment": "1.0.1",    "platform_haproxy": "1.0.36",    "platform_keepalived": "1.0.4",    "platform_octopus": "1.0.13",    "platform_rabbitmq": "1.0.33",    "platform_win": "1.0.71",    "provisioner": "1.0.209",    "queryme": "1.0.2",    "runit": "1.5.10",    "windows": "1.34.2",    "yum": "3.3.2",   "yum-epel": "0.5.1"  }
}

I add the version as an override attribute since you cannot add new top level keys to environment files. However for data_bag files I do insert the version as a top level json key.

Including the sha1

You may have noticed that the environment file displayed above has a sha1 attribute just below the version. Every commit in git is identified by a sha1 hash that uniquely identifies it. While the version number is a human readable form of expressing changes and can still be used to find the specific commit in git that produced the version, having the sha1 included with the version makes it much easier to track down the specific git commit. I can simply do a:

git checkout <sha1>

This will update my working directory to match all code exactly as it was when that version was commited. If you report problems with a cookbook and can give me this sha1, I can bring up its exact code in seconds.

As we have already seen, the sha1 is stored in a separate json attribute for environment and data_bag files. For cookbook metadata.rb file, I add this as a comment to the end of the file:

name        'platform_haproxy'
maintainer  'CenturyLink Cloud'
license     'All rights reserved'
description 'Installs/Configures haproxy for platform'
version     '1.0.36'

depends     'platform_keepalived'
depends     'newrelic'
#sha1 'c53bdaa92d67bea151928cdff10a8d5e634ec880'

Bringing all of this together with automation

At CenturyLink Cloud, we are using this strategy for our own chef versioning. I have been working on a separate “promote” gem that oversees our delivery pipeline of chef artifacts. This gem exposes rake tasks that handle the versioning discussed in this post as well as the process of constraining cookbook versions in various qa and production environments and uploading these artifacts to the correct chef server. The rake tasks tie in to our CI server so that the entire rollout is automated and auditable. I’ll likely share different aspects of this gem in separate posts. It is not currently open source, but I can certainly share snippets here to give you an idea of how this generally works.

Our Rakefile loads in the tasks from this gem like so:

config = Promote::Config.new({  :repo_root => TOPDIR,  :node_name => 'versioner',  :client_key => File.join(TOPDIR, ENV['versioner_key']),  :chef_server_url => ENV['server_url']  })
Promote::RakeTasks.new(config)
task :version_chef => [  'Promote:version_cookbooks',   'Promote:version_environments',   'Promote:version_data_bags'
]

so rake version_chef will stamp all of the necessary artifacts with their appropriate version and sha1. The code for versioning an individual cookbook looks like this:

def version_cookbook(cookbook_name)
  dir = File.join(config.cookbook_directory, cookbook_name)
  cookbook_name = File.basename(dir)
  version = version_number(current_tag, dir)
  metadata_file = File.join(dir, "metadata.rb")
  metadata_content = File.read(metadata_file)
  version_line = metadata_content[/^\s*version\s.*$/]
  current_version = version_line[/('|").*("|')/].gsub(/('|")/,"")

  if current_version != version
    metadata_content = metadata_content.gsub(current_version, version)
    outdata = metadata_content.gsub(/#sha1.*$/, "#sha1 '#{sha1}'")
    if outdata[/#sha1.*$/].nil?
      outdata += "#sha1 '#{sha1}'"
    end
    File.open(metadata_file, 'w') do |out|
      out << outdata
    end
    return { 
      :cookbook => cookbook_name, 
      :version => version, 
      :sha1 => sha1}
  end
end

def version_number(current_tag, ref)
  all = git.log(10000).object(ref).between(current_tag.sha).size
  bumps = git.log(10000).object(ref).between(current_tag.sha).grep(
    "CI:versioning chef artifacts").size
  commit_count = all - bumps
  "#{current_tag.name}.#{commit_count}"
end

This uses the git ruby gem to interact with git and plops in the version and sha1 into metadata.rb. Note, that we exclude all commits labeled “CI:versioning chef artifacts.” After our CI server runs this task, it commits and pushes the changes back to git. We don’t want to include this commit in our versioning. We also adjust our CI version control trigger to filter out this commit from commits that can initiate a build otherwise we would end up in an infinite loop of builds.

Adding a Berkshelf sync

After we generate the new versions but before we push the versions back to git we want to sync up our Berksfile.lock files so we run this:

cookbooks = Dir.glob(File.join(config.cookbook_directory, "*"))
cookbooks.each do |cookbook|
  berks_name = File.join(
    config.cookbook_directory, 
    File.basename(cookbook), 
    "Berksfile")
  if File.exist?(berks_name)
    Berkshelf.set_format :null
    berksfile = Berkshelf::Berksfile.from_file(berks_name)
    berksfile.install
  end
end

This ensures that the CI commit includes up to date Berksfile.lock files that may very well have changed due to the version changes in cookbooks that depend on one another. This will also be necessary in generating the environment cookbook constraints but that will be covered in a future post.

Thoughts?

I realize this is not how most version their chef artifacts or non chef artifacts for that matter. I know many folks use knife spork bump. You can certainly leverage spork with this strategy as well but just provide the git generated version instead of letting spork auto increment. This versioning strategy has proven itself to be very convenient for me on non chef projects. I’d be curious to get feedback from others on this technique. Any obvious or subtle pitfalls you see?

Chef Cookbook dependency management and the environment cookbook pattern

$
0
0

Last week I discussed how we at CenturyLink Cloud are approaching the versioning of cookbooks, environments and data bags focusing on our strategy of generating version numbers using git commit counts. In this post I’d like to explore one of the concrete values these version numbers provide in your build pipeline. We’ll explore how these versions can eliminate surprise breaks when cookbook dependencies in production may be different from the cookbooks you used in your tests. You are testing your cookbooks right?

A cookbook is its own code plus the sum of its dependencies

My build pipeline must be able to guarantee to the furthest extent possible that my build conditions match the same conditions of production. So if I test a cookbook with a certain set of dependencies and the tests pass, I want to have a high level of confidence that this same cookbook will converge successfully on production environments. However, if I promote the cookbook to production but my production environment has different versions of the dependent cookbooks, this confidence is lost because my tests accounted for different circumstances.

Even if these different versions are just at the patch level (the third level version number in the semantic version numbering schema), I still consider this an important difference. I know that only changes of the major build number should include breaking changes but lets just see a show of hands of those who have deployed a bug fix patch that regressed elsewhere…I thought so. You can put your hands down now everyone. Regardless, it can be quite simple to allow major version changes to slip in if your build process does not account for this.

Common dependency breakage scenarios

We will assume that you are using Berkshelf to manage dependencies and that you keep your Berksfile.lock files synced and version controlled. Lets explore why this is not enough to protect from dependency change creep.

Relaxed version constraints

Even if you have rigorously ensured that your metadata.rb files include explicit version constraints, there is never any guarantee that some downstream community cookbook has not specified any constraints in its metadata.rb file. You might think this is exactly where the Berksfile.lock saves you. A Berksfile.lock will snap the entire dependency graph to the exact version of the last sync. If this lock file is in source control, you can be assured that fellow teammates and your build system are testing the top level cookbook with all the same dependency versions. So far so good.

Now you upload the cookbooks to the chef server and when its time for a node to converge against your cookbook changes, where is your Berksfile.lock now? Unless you have something in place to account for this, chef-client is simply going to get the highest available version for cookbook dependencies without constraints. If anyone at any time uploads a higher version of a community cookbook to the chef server that is used by other cookbooks that had been tested against lesser versions, a break can easily occur.

Dependency islands in the same environment

This is related to the scenario just described above and explains how cookbook dependencies can be uploaded from one successful cookbook test run that can break sibling cookbooks in the same environment.

The Berksfile.lock file generates the initial dependency graph upon the very first berks install. Therefore you can create two cookbooks that have all of the same cookbook dependencies but if you build the Berksfile.lock file even hours apart, there is a perfectly reasonable possibility that the two cookbooks will have different versioned dependencies in their respective Berksfile.lock files.

Once both sets are uploaded to the chef server and unless an explicit version constraint is specified, the highest eligible version wins and this may be a different version than some of the cookbooks that use this dependency were tested against. So now you can only hope that everything works when nodes start converging.

Poorly timed application of cookbook constraints

You may be thinking the obvious remedy to all of these dependency issues is to add cookbook constraints to your environment files. I think you are definitely on the right track. This will eliminate the mystery version creep scenarios and you can look at your environment file and know exactly what versions of which cookbooks will be used. However in order for this to work, it has to be carefully managed. If I promote a cookbook version along with all of its dependencies by updating the version constraints in my environment, can I be guaranteed that all other cookbooks in the environment with the same downstream dependencies  have been tested with any new versions being updated?

I do believe that constraining environment versions is important. These constraints can serve the same function as your Berksfile.lock file within any chef server environment. Unless the entire matrix of constraints matches up against what has been tested, these constraints provide inadequate safety.

Safety guidelines for cookbook constraints in an environment

A constraint for every cookbook

Not only your internal top level cookbooks should be constrained. All dependent cookbooks should also include constraints. Any cookbook missing a constraint introduces the possibility that an untested dependency graph will be introduced.

All constraints point to exact versions (no pessimistic constraints)

I do think pessimistic constraints are fine in your Berksfile.lock or metadata.rb files. This basically says you are ok with upgrading dependencies within dev/test scenarios, but once you need to establish a baseline of a known set of good cookbooks, you want that known group to be declared rigidly. Unless you point to precise versions, you are stating that you are ok with “inflight” change and that’s the change that can bring down your system.

Test all changes and all cookbooks potentially affected by changes

You will need to be able to identify what cookbooks that had no direct changes applied but are part of the same graph undergoing change. In other words if both cookbook A and B depend on C and C gets bumped as you are developing A, you must be able to automatically identify that B is potentially affected and must be tested to validate your changes to A even though no direct changes were made to B. Not until A, B, and C all converge successfully can you consider the changes to be included in your environment.

Leveraging the environment cookbook pattern to keep your tree whole

The environment cookbook pattern was introduced by Jamie Windsor in this post. The environment cookbook can be thought of as the trunk or root of your environment. You may have several top level cookbooks that have no direct dependencies on one another and therefore you are subject to the dependency islands referred to above. However if you have a common root declaring a dependency on all your top level cookbooks, you now have a single coherent graph that can represent all cookbooks.

The environment cookbook pattern prescribes the inclusion of an additional cookbook for every environment you want to apply this versioning rigor. This cookbook is called the environment cookbook and includes only four files:

README.md

Providing thorough documentation of the cookbook’s usage.

metadata.rb

Includes one dependency for each top level cookbook in your environment.

Berksfile and Berksfile.lock

These express the canonical dependency graph of your chef environment. Jamie suggests that this is the only Berksfile.lock you need to keep in source control. While I agree it’s the only one that “needs” to be in source control, I do see value in keeping the others. I think by keeping “child” Berksfile.lock files in sync the top level dependencies may fluctuate less often and provide a bit more stability during development.

Generating cookbook constraints against an environment cookbook

Some will suggest using berks apply in the environment cookbook and point to the environment you want to constrain. I personally do not like this method because it simply uploads the constraints to the environment on the chef server. I just want to generate it locally first where I can run tests and version control the environment file first.

At CenturyLink Cloud we have steps in our CI pipeline that I believe not only adds the correct constraints but allows us to identify all cookbooks impacted by the constraints and also ensures that all impacted cookbooks are then tested against the exact same set of dependencies. Here is the flow we are currently using:

Generating new cookbook versions for changed cookbooks

As included in the safety guidelines above, this not only means that cookbooks with changed code get a version bump, it also means that any cookbook that takes a dependency on one of these changed cookbooks also gets a bump. Please refer to my last post which describes the version numbering strategy. This is a three step process:

  1. Initial versioning of all cookbooks in the environment. This results in all directly changed cookbooks getting bumped.
  2. Sync all individual Berksfile.lock files. This will effectively change the Berksflie.locks of all dependent cookbooks.
  3. A second versioning pass that ensures that all cookbooks affected by the Berksfile.lock updates also get a version bump.

Generate master list of cookbook constraints against the environment cookbook

Using the Berksfile of the environment cookbook, we will apply the new cookbook versions to a test environment file:

def constrain_environment(environment_name, cookbook_name)
  dependencies = environment_dependencies(cookbook_name)
  env_file = File.join(config.environment_directory, 
    "#{environment_name}.json")
  content = JSON.parse(File.read(env_file))
  content['cookbook_versions'] = {}
  dependencies.each do | dep |
    content['cookbook_versions'][dep.name] = dep.locked_version.to_s
  end

  File.open(env_file, 'w') do |out|
    out << JSON.pretty_generate(content)
  end
  dependencies
end

def environment_dependencies(cookbook_name)
  berks_name = File.join(config.cookbook_directory, 
    cookbook_name, "Berksfile")
  berksfile = Berkshelf::Berksfile.from_file(berks_name)
  berksfile.list
end

This will result in a test.json environment file getting all of the cookbook constraints for the environment. Another positive byproduct of this code is that it will force a build failure in the event of version conflicts.

It is very possible that one cookbook will declare a dependency with an explicit version while another cookbook declares the same cookbook dependency but with a different version constraint. In these cases the Berkshelf list command invoked above will fail because it cannot satisfy both constraints. Its good that it fails now so you can align the versions before the final constraint is locked and potentially causing a version conflict during a chef node client run.

Run kitchen tests for impacted cookbooks against the test.json environment

How do we identify the impacted cookbooks? Well as we saw above, every cookbook that was either directly changed or impacted via a transitive dependency got a version bump. Therefore it’s a matter of comparing a cookbook’s new version to the version of the last known good tested environment. I've created an is_dirty function to determine if a cookbook needs to be tested:

def is_dirty(environment_name, cookbook_name, environment_cookbook)
  dependencies = environment_dependencies(environment_cookbook)
  cb_dependency = (
    dependencies.select { |dep| dep.name == cookbook_name })[0]

  env_file = File.join(config.environment_directory, 
    "#{environment_name}.json")
    
  content = JSON.parse(File.read(env_file))
  if content.has_key?('cookbook_versions')
    if content['cookbook_versions'].has_key?(cookbook_name)
      curr_version = cb_dependency.locked_version.to_s
      curr_version != content['cookbook_versions'][cookbook_name]
    else
      true
    end
  end
end

This method takes the environment that represents my last known good environment (the one where all the tests passed), the cookbook to check for dirty status and the environment cookbook. If the cookbook is clean, it effectively passes this build step.

In a future post I may go into detail regarding how we utilize our build server to run all of these tests concurrently from the same git commit and aggregate the results into a single master integration result.

Create a new Last Known Good environment

If any test fails, the entire build fails and it all stops for further investigation. If all tests pass, we run through the above constrain_environment method again to produce the final cookbook constraints of our Last Known Good environment which serves as a release candidate of cookbooks that can converge our canary deployment group. The deployment process is a topic for a separate post.

The Kitchen-Environment provisioner driver

One problem we hit early on was that when test-kitchen generated the Berksfile dependencies to ship to the test instance, the versions it generated may differ from the versions in the environment file. This was because Test-Kitchen’s chef-zero driver as well as most the other chef provisioner drivers, run a berks vendor against the Berksfile of the individual cookbook under test. These may produce different versions than a berks vendor against the environment cookbook and it also illustrates why we are following this pattern. When this happens, it means that the individual cookbook on its own runs with a different dependency than it may in a chef server.

What we needed was a way for the provisioner to run berks vendor against the environment cookbook. The following custom provisioner driver does just this.

require "kitchen/provisioner/chef_zero"

module Kitchen

  module Provisioner

    class Environment < ChefZero

      def create_sandbox
        super
        prepare_environment_dependencies
      end

      private

      def prepare_environment_dependencies
          tmp_env = "TMP_ENV"
          path = File.join(tmpbooks_dir, tmp_env)
          env_berksfile = File.expand_path(
            "../#{config[:environment_cookbook]}/Berksfile", 
            config[:kitchen_root])    

          info("Vendoring environment cookbook")    
          ::Berkshelf.set_format :null

          Kitchen.mutex.synchronize do
             Berkshelf::Berksfile.from_file(env_berksfile).vendor(path)

              # we do this because the vendoring converts metadayta.rb
              # to json. any subsequent berks command on the 
              # vendored cookbook will fail
              FileUtils.rm_rf Dir.glob("#{path}/**/Berksfile*")

              Dir.glob(File.join(tmpbooks_dir, "*")).each do | dir |
                cookbook = File.basename(dir)
                if cookbook != tmp_env
                  env_cookbook = File.join(path, cookbook)
                  if File.exist?(env_cookbook)
                    debug("copying #{env_cookbook} to #{dir}")
                    FileUtils.copy_entry(env_cookbook, dir)
                  end
                end
              end
              FileUtils.rm_rf(path)
          end
      end

      def tmpbooks_dir
        File.join(sandbox_path, "cookbooks")
      end

    end
  end
end

Environments as cohesive units

This is all about treating any chef environment as a cohesive unit wherein any change introduced must be considered upon all parts involved. One may find this to be overly rigid or change adverse. One belief I have regarding continuous deployment is that in order to be fluid and nimble, you must have rigor. There is no harm in a high bar for build success as long as it is all automated and therefore easy to apply the rigor. Having a test framework that guides us toward success is what can separate a continuous deployment pipeline from a continuous hot fix fire drill.

Configure and test windows infrastructure using Powershell technologies DSC and Pester running from Chef and Test-Kitchen

$
0
0

About a week ago I attended the 2014 Chef Summit. I got to meet a bunch of new and interesting people and also met several who I had interacted with online but had never seen in person. One new person I met was Jay Mundrawala (@jdmundrawala). Jay works for chef and built a Test-Kitchen Busser for Pester (as a personal oss contribution and not as part of his job at Chef). You might ask…a What for What? Well this post is going to attempt to answer that and explain why I think it is important.

Pester

Pester is a unit testing framework for Powershell. It was originally created by Scott Muc (@scottmuc) a few years back. I joined in in 2012 to add support for Mocking and now development has largely been taken over by Dave Wyatt (@MSH_Dave). It is a BDD style approach to writing and running unit tests for powershell. However, as we will see here, you can write more than just unit tests. You can write a suite of tests to ensure your infrastructure is built and runs as intended.

The whole idea of writing tests for powershell is new to a lot of long time scripters. However, as just mentioned, this framework has been around for a few years but is just now starting to gain some popularity among the powershell community and in fact the Powershell team at Microsoft is now beginning to use it themselves.

Many entrenched in the Chef ecosystem have undoubtedly been exposed to rspec and rspec derivative tools for writing tests for their chef recipes and other ruby gems. Pester is very much inspired by rspec and many familiar with rspec who take a first look at Pester may not immediately notice the difference. There are indeed several differences but the primary difference is one is written in and for ruby and the other powershell.

Test-Kitchen

Test kitchen is a tool that is widely used within the Chef community but can also be used by other Configuration management tools like Puppet. Test kitchen is not a test framework per se but it is a sort of meta framework that provides a plugin architecture around configuration management scripts that makes it easy to use one or more of many testing frameworks with your infrastructure management scripts.

There are issues specific to configuration management that make such a tool as Test-kitchen very useful. In addition to simply running tests, Test-Kitchen can manage the creation and destruction of a VM or other computing resource where tests can be run in a repeatable, disposable and rebuildable manner. Again, this is managed by another plugin family of provisioners. Some may use the vagrant driver, others docker, vsphere, EC2, etc. Using Test-kitchen, I can watch as an instance is provisioned, built, tested ad then destroyed without any side effects impacting my local environment.

The plugin that manages different test frameworks is called the busser. This plugin is responsible for “bussing” code from your local machine to a virtual test instance. Jay’s busser, like all the others simply make sure that Pester gets installed on the system where you want your tests to run. Since Pester is a powershell based tool. You are typically going to be running Pester tests on a windows machine and the cool thing here is that you can write them in “pure” powershell. No need to wrap all of your powershell inside of ruby language constructs. Its all 100% powershell here.

Enter DSC – Microsoft’s Desired State Configuration

This is an interesting one because it is both a product (or API) of a specific technology vendor and a long time philosophical approach to infrastructure management. Some also incorrectly interpret it as a competitor trying to unseat  tools like chef or Puppet. There is indeed some overlap between DSC and other configuration management tools but the easiest way to groc how DSC fits into the CM landscape is as an API for writing resources specifically for windows infrastructure. Chef, Puppet and other tools provide a broad range of features to help you oversee and codify your infrastructure. The DSC surface area is really much simpler. DSC as it stands today consists of a constantly growing set of resources that can be leveraged in your configuration management tool of choice.

What do I mean by “resource?” Resource is a ubiquitous term in the popular CM tools used to provide an abstraction or DSL over a concrete piece of infrastructure (user, group, machine, file, firewall rule, etc) The resource descries how you want this infrastructure to look and does so in code that can be reviewed, tested, linted and source controlled.

You can use straight up DSC to execute these resources which offers a bare bones approach, or you can wrap them inside of a Chef recipe that can live alongside of non-DSC resources. Now the DSC resource for your windows roles and features, sql server HA, registry keys sits inside of your larger Chef infrastructure of nodes, environments, attributes, etc.

Chef making it easy to execute DSC resources

An initial reaction to this by many would be users of DSC is, why would I use Chef? Don’t I have to learn Ruby to work with that? Well because Chef is a full featured, mature configuration management solution, you get access to all of the great reporting, and server management features of chef. If you have a mixed windows/linux shop, you can manage everything with chef. Finally, it can be a bit unwieldy using raw DSC on its own. Before you can execute DSC resources, they must be downloaded and installed. Chef makes that super easy. And as we will see with test-kitchen, now you can plug your powershell based tests right into your chef workflow.

A real world example of executing DSC resources with chef and testing with Pester

We are going to follow a typical chef workflow of writing a cookbook to build a server. In our case it will be an IIS powered web server that hosts a Nuget package feed. Nuget is a windows package management specification very similar to ruby Gems. Its also the same specification behind windows Chocolatey packages similar to apt-get/yum/rpm for linux. Our web server will provide a rest based feed similar to rubygems.org that one can use to discover nuget packages.

Welcome to the bleeding edge

Before we get started let me point out that testing cookbooks on windows has not historically been well supported but there is more interest than ever in it today. There is very active development that is driving to make this possible but it is still not available from the latest stable version of Test-Kitchen. During this year’s Chef Summit, this exact topic was discussed. The creator and maintainer of Test-Kitchen, Fletcher Nichols was present as well as several others either interested in windows support  or actively working to provide first class support for windows like Salim Afiune. I was there as well and I think everyone left with a clear understanding that this work needs to come together in a future version of Test-Kitchen in the near future. I blogged on the current state of this tooling just a couple months ago. This may be seen as a continuation of that post with a specific bend towards powershell and DSC.

I will walk you through how to get your environment configured so that you can do this testing today and I will certainly update this post once the tooling is officially released.

Environment setup

I am going to assume that you do not have any of the necessary tools needed to run through the sample cookbook I am about to show. So you can pick and choose what you need to add to your system. I am also assuming you are using the ruby embedded with chefDK. If you have another ruby versioning environment, chances are you know what to do. Note: this environment does not need to be a windows box.

ChefDK

First and foremost you need chef. The easiest way to get chef along with many of the popular tools in its ecosystem like test-kitchen is to install the Chef development kit. There are downloads available for windows, mac and several linux distributions.

Vagrant

This tutorial will use Vagrant to instantiate a machine to run the cookbook and execute the tests. You can download vagrant from VagrantUp and like chef, it has downloads for all of the popular platforms.

A hypervisor

You will need something that your vagrant flavored VM can run in. Many prefer the free and feature complete VirtualBox. If you run on windows and are currently using versions 8/2012 and above, you may use Hyper-V already on your box. Note you cannot run both on the same boot instance.

Git

You will be using git to download some of the tools I am about to mention.

The WinRM Test-Kitchen fork

This will eventually and hopefully soon be merged into the authoritative test-kitchen repo. This fork has been largely developed by Salim Afiune and can be found here. There is still active development here. Currently I have my own fork of this fork working to improve performance of winrm based file transfers. My fork hopes to dramatically improve upload times of cookbooks to the test instance. The cookbook in this tutorial should just take a couple minutes to upload using my fork compared to nearly an hour and we hope to get the perf much more faster than that. Note that WinRM has no equivalent SCP functionality so implementing this is a bit crude. Here is how you can use and install my fork:

git clone -b one_session https://github.com/mwrock/test-kitchen
copy-item test-kitchen\lib `
  C:\opscode\chefdk\embedded\apps\test-kitchen `
  -recurse -force
copy-item test-kitchen\support `
  C:\opscode\chefdk\embedded\apps\test-kitchen `
  -recurse -force
cd test-kitchen
C:\opscode\chefdk\embedded\bin\gem build test-kitchen.gemspec
C:\opscode\chefdk\embedded\bin\gem install test-kitchen-1.3.0.gem

The Winrm based Kitchen-Vagrant plugin fork

Salim has also ported his enhancements to the popular Kitchen-Vagrant Test-Kitchen plugin. Since this tutorial uses vagrant, you will need this fork. Note that if you plan to use Hyper-V or a non VirtualBox hypervisor, please use my fork that includes recent changes to make vagrant and the winrm test kitchen work outside of VirtualBox. Here is how to get and install this:

git clone -b Transport https://github.com/mwrock/kitchen-vagrant
cd kitchen-vagrant
C:\opscode\chefdk\embedded\bin\gem build kitchen-vagrant.gemspec
C:\opscode\chefdk\embedded\bin\gem install kitchen-vagrant-0.16.0.gem

The dsc_nugetserver repository containing a sample cookbook and pester tests

This can simply be cloned from https://github.com/mwrock/dsc_nugetserver.

DSC in a chef recipe

Similar to the WinRM Test-Kitchen work, the DSC recipe work done by the folks at chef is still in fairly early development. There is a dsc_script resource available in the latest chef client release as of this post. There is also a community cookbook that represents a prototype of work that will be evolved into the core chef client. This cookbook contains the dsc_resource resource.

I intentionally wrote the dsc_nugetserver cookbook almost entirely from DSC resources. Lets take a look in the default recipe and observe the two flavors of the dsc resource.

dsc_script

dsc_script  "webroot" do
  code <<-EOH
    File webroot
    {
      DestinationPath="C:\\web"
      Type="Directory"
    }
  EOH
end

This is what is currently supported by the official chef-client and ships with the latest version. They really just wrap the DSC Configuration syntax supported by powershell today. The benefit that you get using it inside of a chef recipe are that you can now use the dsc_script as just another resource in your wider library of cookbooks. Chef also does some leg work for you. You do not need to worry about where the resource is installed and you do not need to compile the resource before use.

dsc_resource

dsc_resource "http firewall rule" do
  resource_name :xfirewall
  property :name, "http"
  property :ensure, "Present"
  property :state, "Enabled"
  property :direction, "Inbound"
  property :access, "Allow"
  property :protocol, "TCP"
  property :localport, "80"
end

This is really similar if not the same as dsc_scipt just with different syntax. Note the use of the property DSL. dsc_resource also does a much better job at finding the correct resource. While I believe that dsc_script only works with the official microsoft preinstalled resources, the community dsc cookbook can locate the newer experimental resources that are being distributed as part of the community resource kit waves.

Using the resource_kit recipe to download and install all of the current resource wave kit modules

I have included a recipe that will download the latest batch of resource wave dsc resources. I basically just copied this from one of chef’s own cookbook examples and replaced the download url with the latest resource wave. Once this recipe runs, literally all dsc resources are available for you to use.

Whatif Bug affecting most resources used within chef

There is a bug in both of the dsc resource flavors that will cause most resources to crash. If the dsc resource either does not support ShouldProcess of if the underlying call to powershell DSC’s Set-TargetResource results in the function throwing an error, these chef resources currently to not provide graceful failure for these scenarios. So as is, the resource will break when called. The chef team knows about this and has a fix that will be released in a future release.

In the meantime, I have forked the community dsc_resource in the dsc cookbook and commented out a single line. I can consume this fork from any cookbook by adding this to the Berksfile:

source "https://supermarket.getchef.com"

metadata

cookbook 'dsc' , git: 'https://github.com/mwrock/dsc'

Converging the recipe

The sample cookbook comes with both a .kitchen.yml file that includes a pointer to an evaluation copy of windows 8.1 for testing. I would have included a 2012 box instead but my 2012 vagrant box is Hyper-V only and I have not had time to add virtual box.

So running:

kitchen converge

Should create a windows box for testing and converge that box to run the sample recipe.

[2014-10-13T02:34:38-07:00] INFO: Getting PowerShell DSC resource 'xfirewall'
[2014-10-13T02:35:26-07:00] INFO: DSC Resource type 'xfirewall' Configuration completed successfully
[2014-10-13T02:35:29-07:00] INFO: Chef Run complete in 534.665725 seconds
[2014-10-13T02:35:29-07:00] INFO: Removing cookbooks/dsc_nugetserver/files/default/NugetServer.zip from the cache; it is no longer needed by chef-client.
[2014-10-13T02:35:29-07:00] INFO: Running report handlers
[2014-10-13T02:35:29-07:00] INFO: Report handlers complete
Finished converging <default-windows-81> (13m6.61s).
-----> Kitchen is finished. (13m11.87s)
C:\dev\dsc_nugetserver [master]>

Note that there is a chance the kitchen converge will fail shortly after creating the box and just before downloading the chef client. My suspicion is that this is because the windows 8.1 box is hard at work installing updates and the initial winrm call times out. I have always had success immediately calling kitchen converge again.

So once this completes, you should be able to open a local browser and point at your test box to see the nuget server informational home page:

Testing the recipe with Pester

Here are the tests we will run with Pester:

describe "default recipe" {

  it "should expose a nuget packages feed" {
    $packages = Invoke-RestMethod -Uri "http://localhost/nuget/Packages"
    $packages.Count | should not be 0
    $packages[0].Title.InnerText | should be 'elmah'
  }

  context "firewall" {

    $rule = Get-NetFirewallRule | ? { $_.InstanceID -eq 'http' }
    $filter = Get-NetFirewallPortFilter | ? { $_.InstanceID -eq 'http' }

    it "should filter port 80" {
      $filter.LocalPort | should be 80
    }
    it "should be enabled" {
      $rule.Enabled | should be $true
    }
    it "should allow traffic" {
      $rule.Action | should be "Allow"
    }
    it "should apply to inbound traffic" {
      $rule.Direction | should be "Inbound"
    }    
  }
}

This is 100% powershell. No ruby to see here.

This is first going to test our nuget server website. If all went as we intended, an http call to the root of localhost should reach our nuget server and it should behave like a nuget feed. So here we expect the Packages feed to return some packages and knowing what the first package should be, we test that its name is what we expect.

Because Test-Kitchen runs tests on the converged node, we need to be sure that the outside world can reach our entry point. So we go ahead and test that we opened the firewall correctly.

kitchen verify

The kitchen Pester busser now installs Pester:

C:\dev\dsc_nugetserver [master]> kitchen verify
-----> Starting Kitchen (v1.3.0)
-----> Setting up <default-windows-81>...
       Successfully installed thor-0.19.0
       Successfully installed busser-0.6.2
       2 gems installed
       Plugin pester installed (version 0.0.6)
-----> Running postinstall for pester plugin
-----> [pester] Installing PsGet
Downloading        PsGet from https://github.com/psget/psget/raw/master/PsGet/PsGet.psm1
PsGet is installed and ready to use
       USAGE:
           PS> import-module PsGet
           PS> install-module PsUrl

       For more details:
           get-help install-module
       Or visit http://psget.net
-----> [pester] Installing Pester

Then it runs our tests:

-----> Running pester test suite
-----> [pester] Running
Executing all tests in 'C:\tmp\busser\suites\pester'Describing        default recipe
[+] should expose a nuget packages feed 4.02s   Context        firewall
[+] should filter port 80 3.18s           
[+] should be enabled 16ms
[+] should allow traffic 12ms
[+] should apply to inbound traffic 13ms
Tests completed in 7.23s
       Passed: 5 Failed: 0
       Finished verifying <default-windows-81> (0m22.55s).
-----> Kitchen is finished. (0m59.74s)
C:\dev\dsc_nugetserver [master]>

Bugs regarding Execution Policy

One issue I ran into both with the dsc_resource resource and the Pester busser was a failure to bypass the ExecutionPolicy of the Powershell.exe process. This means if no one has explicitly set an execution policy on the box which they would not have if this is a newly provisioned machine and unless this is windows server 2012R2 which implements a new default ExecutionPolicy of RemoteSigned instead of Undefined, the converge will fail complaining that the execution of scripts are not allowed to run. Since the test vagrant box used here is windows 8.1, it is susceptible to this bug.

You can work around this by setting the execution policy in the recipe as is done in the sample:

powershell_script "set execution policy" do
  code <<-EOH
    Set-ExecutionPolicy -ExecutionPolicy RemoteSigned -Force
    if(Test-Path "$env:SystemRoot\\SysWOW64") {
      Start-Process "$env:SystemRoot\\SysWOW64\\WindowsPowerShell\\v1.0\\powershell.exe" -verb runas -wait -argumentList "-noprofile -WindowStyle hidden -noninteractive -ExecutionPolicy bypass -Command `"Set-ExecutionPolicy RemoteSigned`""
    }
    EOH
end

We set the policy for both the 64 and 32 bit shells since chef-client is a 32 bit process.

I have filed an issue with the dsc cookbook here and submitted a pull request for the busser here.

Testing on windows keeps getting better

We are still not where we need to be but we are making progress. This is a big step I think to adding accesibility to the work coming out of the Microsoft DSC initiatives. Here you have all the tools you need to not only execute DSC resources but also test them. A big thanks to Jay and Salim for their work here with Test Kitchen and the Pester busser!

If you want to learn more about DSC or Chef and particularly DSC in Chef. Pay attention to Steven Murawski's blog. Steven is a Chef Community manager and has done a ton of work with DSC at his previous employer Stack Exchange, the home of StackOverflow.com.


Cloud Automation in a Windows World via InfoQ

$
0
0

This week InfoQ published an article I wrote entitled "Cloud Automation in a Windows World." The article could just as well been given the title "Automation in a Windows World" since there is nothing exclusive to cloud in the article. The article is a survey of automation strategies and tools used for windows provisioning and environment definition and management.

When it comes to compute resource automation, windows has not traditionally been known to be a leader in that space. This article discusses this historical gap and illustrates some of the ways in which it is closing.

I discuss ways in which we automate windows at CenturyLink Cloud and I point to a variety of tools that anyone can use today to assist in windows environment automation, be it a cloud or your grandma's PC. Among other technologies I mention Chef, Powershell DSC, Chocolatey, Boxstarter, Vagrant, and the future of windows containers.

If this all sounds interesting, please give it a read.

Help raise the Chocolatey experiment to the Chocolatey experience and support the Chocolatey Kickstarter!

$
0
0

Mmm…Chocolatey…

As described on the homepage of Chocolatey.org, Chocolatey is like Apt-Get for windows. Now to some, that will immediately paint a clear picture of what Chocolatey is and why it puts the “awesome” into windows just like it does on my winawesomedows system. Others may be asking, “what get?” Or maybe, “that’s ok. I’m not in the market for an apartment right now.” For those who are not familiar with package management systems on other operating systems, Chocolatey makes it easy to find, download and install software. I cant remember the last time I searched for the windows git installer and went through all the screens in the install wizard. I just pop open a command line and type: ‘cinst git’. Curious what you can install via chocolatey? Check out chocolatey.org and you’ll find the over 2300 packages available for download and install.

Beyond this immediate value of installation ease, Chocolatey makes it easy to create packages and provides a platform that anyone can leverage to support private and alternate repositories other than the public community feed on chocolatey.org.

Chocolatey launches a Kickstarter

About a week and a half ago, Rob Reynolds (@ferventcoder) and team launched a kickstarter for chocolatey to help raise funds to not only preserve the value chocolatey currently provides to many many windows users but to help fund some greatly needed enhancements.

Chocolatey costs

While the benefits of chocolatey are free to anyone with access to a windows command line (or powershell console), there is a cost. Hosting these packages entails monthly storage and bandwidth expenses. There is also a huge time investment on the part of Chocolatey contributors and especially Rob Reynolds to address support questions and add features. I’m personally on the chocolatey email groups and I can tell you that I see a constant stream of emails from Rob every day addressing issues, merging PRs, and announcing new features. Gary Park (@gep13) is another individual who immediately comes to mind as an avid supporter. While no one has officially stated this, I can only imagine that asking Rob (husband and father of two) to continue to personally front the recurring costs and invest this amount of time is not sustainable and certainly not scalable.

Professional level offering

In addition to recurring expenses and some first-line support assistance, there are a slew of “professional grade” features the team would like to add to make Chocolatey a more polished experience for those needing to support an enterprise or other business critical infrastructure. These would include, enhanced security, better support for private feeds and other slick features as described in this image from the kickstarter:

New feature: Package moderation

Unrelated to the kickstarter but adding to the evidence that funding can only make things better is a new feature just launched the afternoon prior to this writing – package moderation. One of the most prevelant criticisms of Chocolatey is the fact that it potentially exposes users to malware. This is absolutely true. When you download a chocolatey package, you are downloading software over the open internet and you likely do not know the individual who created the package. The package may state that it installs one thing, but nothing stops it from doing something else or generally doing a sloppy job of installing what it is advertising.

To be clear, I do not believe that this truth implies that chocolatey should not be included in ones tool set. Its not the only package management system with these flaws and there are steps individuals and businesses can take today to protect themselves like pinning to known good package versions or hosting their own chocolatey feed.

Package moderation is one of many other features that stand to enhance the overall security story of Chocolatey. New packages, including package updates must now be approved by a Chocolatey moderator in order to be publicly visible and available to others. Here are some criteria that moderators use to deem a package approved:

  1. Is the package named appropriately? 
  2. Is the title appropriate? 
  3. Does it have all the links? ProjectUrl at the very least. 
  4. Is the description sufficient to explain the software? 
  5. Are the authors pointed to the actual authors and not the package maintainers? 
  6. Does the package look generally safe for consumption? 
  7. Are links in the package to download software using the appropriate location? 
  8. Does the package generally meet the guidelines set forth? 
  9. Does the install and uninstall scripts make sense or are there variables being used that don't work? 
  10. Does the package actually work?

Of course this feature does incur more time on the part of the core chocolatey team and is an example of another area of Chocolatey that this kickstarter aims to support.

Call to action!

So in the spirit of this blog, HurryUpAndWait, I encurage you to hurry up and offer what you feel comfortable contributing and then wait for the success of this kickstrarter! Do you work for a business that uses chocolatey? Perhaps it uses the chocolatey chef cookbook or the chocolatey puppet module. If you have access to those who make financial decisions in these organizations, let them know about how they can help to make chocolatey a more business friendly option that stands to improve its ability to automate.


The 80s just called - they want their telnet client back

$
0
0

Telnet has been around ever since I was born. No..really..it was developed in 1968 and the very first protocol used on the ARPAnet. That’s right kids, when grandpa wanted to send an email, he used telnet.

I don’t think I have used Telnet for its intended use since the late nineties, but for years and years, enabling the stock Microsoft telnet client has been part of my routine setup script for any windows box I work with.

dism /Online /Get-FeatureInfo /FeatureName:telnet-client

For me and many of my colleagues, this is often the simplest, albeit crude, tool to help determine if a remote machine is listening on a specific port. Its certainly not the only tool, but one is nearly guaranteed that this can be found on any windows OS.  

On linux, Netcat is a similarly ubiquitous tool that is typically installed with most distributions:

nc -z -w1 boxstarter.com 80;echo $?

This will return 0, if the specified host is listening on port 80.

Why is this important?

Perhaps you are a web developer and your web site goes down. One key troubleshooting step is to determine if the web server is even up and listening on port 80. Or maybe SSL traffic is broken and you are wondering if the server is listening to port 443. The answer to these questions may very well tell you which of many possible paths is the best to pursue in finding the root of your problem.

So you whip out your command line console and simply run:

telnet myhost.com 80

If the machine is in fact listening on port 80, I will likely get a blank screen. Otherwise, the command will hang and eventually timeout. This always felt clunky, but it worked. Oh sure, since powershell became available, I could write a script that worked with the .net library to construct a raw socket to reach an endpoint and thereby get the same information. But that’s just more code to write.

A better way

Since powershell version 4 which ships with Windows 8.1 and server 2012R2, there is a new cmdlet that provides a much more elegant means of getting this information.

C:\dev\WinRM [v1.3]> Test-NetConnection -ComputerName boxstarter.org -Port 80
WARNING: Ping to boxstarter.org failed -- Status: TimedOut
ComputerName           : boxstarter.org
RemoteAddress          : 168.62.20.37
RemotePort             : 80
InterfaceAlias         : vEthernet (Virtual External Switch)
SourceAddress          : 192.168.1.7
PingSucceeded          : False
PingReplyDetails (RTT) : 0 ms
TcpTestSucceeded       : True
C:\dev\WinRM [v1.3]>

So now I have the same information plus some other bits of useful data given to me in a much more easily consumable format. Not only can I see that a site is responding to TCP port 80 requests, I see the IP address that the host name resolves to and I notice that the server is configured not to respond to ping requests.

Some may complain that Test-NetConnection requires far too many key strokes. Well there is a built in alias that points to this cmdlet allowing you to shorten the above command to:

TNC boxstarter.org -port 80

And if you don’t like having to include the -Port parameter name, the -CommonTCPPort is the next parameter in the default parameter order which takes the possible values of "HTTP,RDP,SMB,WINRM". So this means you get the same result as the command above using:

TNC boxstarter.org HTTP

So lose the telnet, and remember TNC – and welcome to the twenty first century!

In search of a light weight windows vagrant box

$
0
0

Windows... No getting around it - its a beast compared to the size of its linux step sibling. When I hear colleagues complaining about pulling down a couple hundred MB to get their linux vagrant box up and running, I feel like a third world scavenger of disk space while they whine about their first world 100mb problems. While this post does not solve this problem, it does provide a way to deliver a reasonably sized windows box weighing in under 3GB.

This post will explain how to:

  • Obtain a free evaluation server 2012 R2 ISO
  • Prepare a minimally sized VM image
  • Package the VM for use via vagrant both in VirtualBox and Hyper-V
  • Allow the box to be accessed by others over the web. The world wide web.

I may follow up with a more automated approach but here I'll be walking through the process fairly manually. However my instructions will largely be command line samples so one should be able to cobble together a script that performs all of this. I will be doing just that.

Downloading an evaluation ISO

The Technet evaluation center provides free evaluation copies of the latest operating systems. As of this post, the available operating systems are:

  • Server 2012R2
  • Server 2012
  • Server 2008 R2
  • Windows 8.1
  • Windows 8
  • Windows 7

These are fully functional copies with a limited lifetime. I believe the client SKUs are 90 days and the server SKUs are 180 days. Server 2012 R2 is definitely 180 days. Once the evaluation period expires, you can download a new evaluation and the trial period begins anew. Some may say like a new spring. Others will choose to describe it differently but either way it is perfectly legit.

The evaluation center provides several formats for download including ISO, VHD, and Azure VM. I prefer to download the ISO since it is much smaller than the VHD and it can be used to create both a Hyper-V and VirtualBox VM.

Create the VM

I am assuming here that you are familiar with how to do this on your preferred hypervisor platform. However I recommend that you choose the following file formats:

VHD (gen 1) on Hyper-V

Unless you know that this vagrant box will only be used on windows 8.1 or server 2012 R2 hosts, a generation 2 .vhdx format will not work on older OS versions. Chances are that most vagrant use cases will not be taking advantage of the generation 2 features anyways.

.vmdk on Virtual Box

The reason for this will become more apparent when we get to packaging the VM. The short answer here is that this is going to put you in a better position for a more optimally compressed (likely much more) box file.

Note: You cannot run Hyper-V and VirtualBox on the same machine. You can create second boot record, but I have had too many bad experiences uninstalling VirtualBox on windows and ending up with a corrupted network stack. So I am using Hyper-V on my windows box and VirtualBox on my Ubuntu machine.

When the ISO installation begins, you will be given a choice of Standard or DataCenter editions as well as whether to install with the GUI or not. I am installing Server 2012 R2 Standard with GUI.

Preparing the image

Here we want to ensure our VM can interact with vagrant with as little friction as possible and be as small as possible.

Configuring the vagrant user

By default, vagrant handles all authentication with a user named 'vagrant' and password 'vagrant'. So we will rename the built-in administrator to 'vagrant' and change the password to 'vagrant'.

First thing that needs to happen here is to turn off the password complexity policy that is enabled by default on server SKUs. To do this:

  1. Run gpedit from a command prompt
  2. Navigate to Computer Configuration -> Windows Settings -> Security Settings -> Account Policies -> Password Policy
  3. Select 'Password must meet complexity requirements' and disable

Good riddens complexity!

Now we jump to powershell and rename the administrator account and change its password to vagrant:

$admin=[adsi]"WinNT://./Administrator,user"
$admin.psbase.rename("vagrant")
$admin.SetPassword("vagrant")
$admin.UserFlags.value = $admin.UserFlags.value -bor 0x10000
$admin.CommitChanges()

This may be obvious but that second to the last line instructs the password to never expire. Its a good idea to reboot at this point since you are currently logged in as this user and things can and will get weird eventually if you don't.

Configure WinRM

While server 2012 R2 will have powershell remoting automatically enabled, we need to slightly tweak the winrm configuration to play nice with vagrant's ruby flavored winrm implementation:

winrm set winrm/config/client/auth '@{Basic="true"}'
winrm set winrm/config/service/auth '@{Basic="true"}'
winrm set winrm/config/service '@{AllowUnencrypted="true"}'

Allow Remote Desktop connections

Vagrant users may use the vagrant rdp command to access a vagrant vm so we want to make sure this is turned on:

$obj = Get-WmiObject -Class "Win32_TerminalServiceSetting" -Namespace root\cimv2\terminalservices
$obj.SetAllowTsConnections(1,1)

Enable CredSSP (2nd hop) authentication

Users may want to use powershell remoting to access this server and need to authenticate to other network resources. Particularly on a vagrant box, this may be necessary to access synced folders as a network share. In order to do this in a powershell remoting session, CredSSP authentication must be enabled on both sides. So we will enable it on the server:

Enable-WSManCredSSP -Force -Role Server

Enable firewall rules for RDP and winrm outside of subnet

Server SKUs will not allow remote desktop connections by default and non domain users making winrm connections will be refused if they are outside of the local subnet. So lets turn that on:

Set-NetFirewallRule -Name WINRM-HTTP-In-TCP-PUBLIC -RemoteAddress Any
Set-NetFirewallRule -Name RemoteDesktop-UserMode-In-TCP -Enabled True

Shrink PageFile

The page file can sometimes be the largest file on disk with the least amount of usage. It all depends on your configuration but lets trim ours down to half a gb.

$System = GWMI Win32_ComputerSystem -EnableAllPrivileges
$System.AutomaticManagedPagefile = $False
$System.Put()

$CurrentPageFile = gwmi -query "select * from Win32_PageFileSetting where name='c:\\pagefile.sys'"
$CurrentPageFile.InitialSize = 512
$CurrentPageFile.MaximumSize = 512
$CurrentPageFile.Put()

You will need to reboot to see the page file change size but you can continue on without issue and reboot later.

Change the powershell execution policy

We want to make sure users of the vagrant box can run powershell scripts without any friction. We'll assume that all scripts are safe within the blissful confines of our vagrant environment:

Set-ExecutionPolicy -ExecutionPolicy Unrestricted

Unrestricted. To some its an execution policy. Others - a lifestyle.

Install Important Windows Updates

Not gonna bore you with the details here. Simply install all important windows updates (dont bother with optional updates), reboot and repeat until you get the final green check mark indicating you have gotten them all.

Cleanup WinSXS update debris

Now that we have installed those updates there are gigabytes (not many but enough) of backup and rollback files lying on disk that we dont care about. We are not concerned with uninstalling any of the updates. New in windows 8.1/2012 R2 (and back ported to win 7/2008R2) there is a command that will get rid of all of this unneeded data:

Dism.exe /online /Cleanup-Image /StartComponentCleanup /ResetBase

This may take several minutes, but if you can make it through the updates, you can make it through this.

Additional disk cleanup

On windows client SKUs you have probably used the disk cleanup tool to remove temp files, error reports, web cache files, etc. This tool is not available by default on server SKUs but you can turn it on. We will go ahead and do that:

Add-WindowsFeature -Name Desktop-Experience

This will require a reboot to take effect, but once that completes, the "Disk Cleanup" button should be available on the property page from the root of our C: drive or we can launch from a command line:

C:\Windows\System32\cleanmgr.exe /d c:

Go ahead and check all the boxes. Chances are this wont get rid of much on this young strapping box but might as well jettison all of this stuff.

Features on Demand

One new feature in server 2012 R2 is the ability to remove features not being used. Every windows installation regardless of the features enabled (IIS, Active Directory, Telnet, etc) has almost all of these features available on disk. However the majority will never be used and there is alot of space to be saved here by removing them.

Its really up to your own discretion as to what features you will need. In this post we are going to remove practically everything other than the bare essentials for running a GUI based server OS. If you plan to use the box for web work, you may want to go ahead and enable IIS and any related web features you think you will need now. Once a feature is removed, some features are easier to restore than others. For instance, the telnet-client feature will just be downloaded from windows update server if you choose to add it later. However, if you need to re-add the desktop-experience feature, you will need installation media handy and must point to a source .wim file. I really don't know what the logic is that determines what can be downloaded from the public windows update service and what cannot but its good to be aware of this.

First we will remove (not uninstall yet) the features that are currently enabled that we do not need:

@('Desktop-Experience',
  'InkAndHandwritingServices',
  'Server-Media-Foundation',
  'Powershell-ISE') | Remove-WindowsFeature

Now we can iterate over every feature that is not installed but 'Available' and physically uninstall them from disk:

Get-WindowsFeature | 
? { $_.InstallState -eq 'Available' } | 
Uninstall-WindowsFeature -Remove

At this point its a good idea to reboot the vm and then rerun the above command just to make sure you got everything. For some reason I find that the InkAndHandwritingServices feature is still lying around. A fantastic feature I have no doubt but trust me, you don't need it.

Defragment the drive

Now we will defrag and possibly retrim the drive using the powershell command:

Optimize-Volume -DriveLetter C

Purge any hidden data

Its possible there is unallocated space on disk with data remaining that can hinder the ability to compact the disk and also limit the compression algorithm's ability to fully optimize the size of the final box file. There is a sysinternals tool, sdelete, that will "0 out" this unused space:

wget http://download.sysinternals.com/files/SDelete.zip -OutFile sdelete.zip
[System.Reflection.Assembly]::LoadWithPartialName("System.IO.Compression.FileSystem")
[System.IO.Compression.ZipFile]::ExtractToDirectory("sdelete.zip", ".") 
./sdelete.exe -z c:

Shutdown

Stop-Computer

Packaging the box

At this point you should hopefully have a total disk size of roughly 7.5GB. For a windows server, thats pretty good. We are now ready to package up our vm into a vagrant .box file that can be consumed by others. The process for doing so is going to be different on Hyper-V and Virtualbox so I will cover both separately.

Hyper-V

First thing, compact the vhd:

Optimize-VHD -Path C:\path\to\my.vhd -Mode Full

On my laptop, the VHD just shrank from 13 to 8 GB.

Next we will export the VM:

Export-VM -Name win2012R2 -Path C:\dev\vagrant\Win2k12R2\test

Note that my VM name is win2012R2 and after this command completes, I should have a directory named c:\dev\vagrant\Win2k12R2\test\win2012R2 with three subdirectories:

  • Snapshots
  • Virtual Hard Disks
  • Virtual Machines

We can delete the Snapshots directory:

Remove-Item C:\dev\vagrant\Win2k12R2\test\win2012R2\Snapshots -Recurse -Force

Now there are two text files that we want to create in the root c:\dev\vagrant\Win2k12R2\test\win2012R2 directory. The first is a small bit of JSON:

{
  "provider": "hyperv"
}

Save this as metadata.json. Lastly, and this is optional, we will create an initial Vagrantfile:

# -*- mode: ruby -*-
# vi: set ft=ruby :

VAGRANTFILE_API_VERSION = "2"

Vagrant.configure(VAGRANTFILE_API_VERSION) do |config|
  config.vm.guest = :windows
  config.vm.communicator = "winrm"
end

By adding this to the Box, it ensures that a user can run vagrant up without any initial vagrant file, and have a succesful windows experience. However, it is customary for most vagrant projects to include these settings in their project Vagrantfile in which case having this file in the box file is redundant.

We are now ready to create the final box file. This is expected to be a .tar archive with a .box extension. The name (before the extension) doesn't matter but keep it short with no spaces. I found that not just any tar archiver will work on windows and this can be a big stumbling point on a windows system where tarring is not "normal" and you may not even have tar.exe or bsdtar.exe installed.

A note of caution: You obviously have vagrant installed and vagrant comes with a version of bsdtar.exe compiled for the windows platform. However, as of version 1.6.5, this executable will not work on tar files with a final size greater than 2GB. Sadly, ours will be greater than that. Also, if you have GIT installed, it too has a tar.exe installed with similar limitations. Many may assume they can create a .tar using the popular 7zip. Technically this is true but I have not been succesful in having the final .tar play nice with vagrant. I have had success with two available solutions:

  • The version of tar.exe that is available with cygwin. I'm not a big cygwin fan and this tar requires several command switches be properly set to produce an archive that will work with vagrant: tar --numeric-owner --group=0 --owner=0 -czvmf win2kr2.box * is what worked for me. The options here ensure the ACLs are cleared out and the m option clears the timestamps.
  • (recommended) Nikhil Benesch has been kind enough to make available a version of bsdtar.exe that works great and can be downloaded here.

So assuming you have Nikhil's bsdtar on your path, run this inside the same directory that holds your exported Hyper-V directories and the two text files (metadata.json and Vagrantfile) you created:

bsdtar --lzma -cvf package.box *

Very important: the --lzma switch instructs bsdtar to use the lzma compression algorithm. This is the same algorithm 7zip uses as its default. This can dramatically reduce the size of the final box file (like 40%) over gzip. It also dramatically increases the time (and CPU) bsdtar will take to create the file. So some patience is needed but in my opinion it is well worth it. This is a one time cost and it will NOT impact decompression time which is what really matters.

VirtualBox

We will be following roughly the same process we used for Hyper-V with a couple deviations. Note that the instructions that follow differ from the guidance given in the vagrant documentation as well as most blogs. These instructions are optimized for a small file size. You can use the vagrant package command to produce virtualbox packages but that will produce a much larger file (3.9GB vs 2.75GB) than the steps that follow.

The first main difference is that we will not compact the .vmdk. Virtualbox can only compact its native .vdi files. This is ok since the final compression step will take care of this for us.

First step: export the virtualbox VM:

vboxmanage export win2012r2 -o box.ovf

Here win2012r2 is the name of the vm in the virtualbox GUI. It is important that the name of the outputted .ovf file is box.ovf. Do not use a different name.

Now for something not so intuitive: delete the exported .vmdk file that was created. It is dead to us. Regardless of the initial file type you use to create a virtualbox vm, the export command will always convert the drive to a compressed .vmdk. This compression is not ideal. What you want to do after deleting this file is copy the original .vmdk file of the vm to the same directory where your box.ovf file exists and rename it to the same name of the .vmdk you just deleted. This should be box-disk1.vmdk.

This is why we used a .vmdk (the native vmware format) in the first place. Later when this file is imported back to virtualbox by vagrant, it is going to expect a vmdk file. However, if we used the one compressed by the export command, we are stuck with the compression it yields. By using the original uncompressed .vmdk, we allow the archiver to use lzma and can get a MUCH smaller file.

Just as was shown with Hyper-V above, we want to add the same two text files to this export directory but their contents will be slightly different. The first one, metadata.json should contain:

{
  "provider": "virtualbox"
}

Next our Vagrantfile should look like:

# -*- mode: ruby -*-
# vi: set ft=ruby :

# Vagrantfile API/syntax version. Don't touch unless you know what you're doing!
VAGRANTFILE_API_VERSION = "2"

Vagrant.configure(VAGRANTFILE_API_VERSION) do |config|
  config.vm.guest = :windows
  config.vm.communicator = "winrm"
  config.vm.base_mac = "080027527704"
  config.vm.provider "virtualbox" do |v|
    v.gui = true
  end
end

Your file should have one key difference. Make sure that the MAC address matches the one in the settings of your VM. I'm pretty sure its gonna be different. So you should now have four files in your export directory:

  • box.ovf
  • box-disk1.vmdk
  • metadata.json
  • Vagrantfile

Navigate to this directory. I'm on an ubuntu desktop so I'm just gonna use the native tar. If you are on a windows host. Follow the same instructions for the compression above for Hyper-V. On my linux box I will package using:

tar --lzma -cvf package.box *

Again, the name of the box file other than the extension is not important. Also, this may take a long time. Maybe an hour. Its worth it. Its a one time cost and while much longer than producing a gzip archive, you should end up with a 2.75 GB file that will take just as long to import as the same 3.9GB file gzip would produce.

Its a win-win!

Do I have to create the box twice?

No. You can create the box in Virtual box and then clone to a .vhd based box. Then you can create a new Hyper-V VM and instead of creating a new drive, use the existing .vhd from your virtualbox vm. Just make sure your Hyper-V vm is a generation 1 vm. Thats probably the easiest way to do it. You could also create the vm in Hyper-V and then create a .vhd based virtualbox vm using your Hyper-V vm instead of creating a new one. Then copy the vhd to a vmdk based vm. Granted this is still not an ideal or seamless migration but it is one way to get around having to run through the entire box preparation twice and ensuring the two boxes are identical.

Testing your box

Before going to the trouble of uploading your box to the web and making it public, you will want to test vagrant up on the package you just created locally. This is just three commands:

vagrant box add test-box /path/to/package.box
vagrant init test-box
vagrant up

This first places the box into your global vagrant cache. By default this is a folder named .vagrant.d in your home directory. You can move it by creating an environment variable VAGRANT_HOME that points to the directory where you want to keep it. I keep mine on a different drive.

Next, vagrant init creates a Vagrantfile in your current directory so that now any time you want to interact with this box, issuing vagrant commands from this directory will affect this box.

Vagrant up to Hyper-V

Finally vagrant up will create the box in your provider and start it. For Hyper-V, or any provider other than virtualbox, you need to either include a --provider option:

vagrant up --provider hyperv

or you can set an environment variable VAGRANT_DEFAULT_PROVIDER to hyperv.

Uploading your box to the world wide web

In order for your packages to be accessible to others, you are gonna want to do two things:

  1. Upload the .box files somewhere where they can be accessed via HTTP.
  2. Optionally, publish those URLs on VagrantCloud.

You have lots of options for where to place the box files. Amazon S3, Azure storage and just recently I have been using CenturyLink Cloudobject storage. I believe dropbox works but I have not tried that. Here is a script I have used in the past to upload to my Azure storage account:

$storageAccountKey = Get-AzureStorageKey 'mystorageaccount' | %{ $_.Primary }
$context = New-AzureStorageContext -StorageAccountName 'mystorageaccount' -StorageAccountKey $storageAccountKey
Set-AzureStorageBlobContent -Blob 'package.box' -Container vhds -File 'c:\path\to\package.box' -Context $context -Force

Publishing your box to VagrantCloud.com

You can certainly share your vagrant box once accessible from a URL. You simply need to share a Vagrantfile with a url setting included:

config.vm.box_url = "https://wrock.ca.tier3.io/win2012r2-virtualbox.box"

This tells vagrant to fetch the image from the provided URL if it is not found locally. However, vagrant hosts a repository where you can store images for multiple providers and where you can add documentation and versioning. This repository is located at vagrantcoud.com and allows you to give a box a canonical identifier where users can get the latest version (or specify a specific version) of the box compatible with their hypervisor.

Simply create an account at vagrantcloud. Creating an account is free as long as you are fine with your box files being public and you host the actual boxes elsewhere like amazon, azure or CenturyLink Cloud. Once you have an account, you can create a box which initially is composed of just a name and description.

Next you can add box URLs for individual providers that point to an actual .box file. With a paid account you can host the box files on vagrant cloud.

Now your username and box name form the cannonical name of your box. Vagrant will automatically try to find boxes on vagrantcloud if the box cannot be found locally. Every box on vagrantcloud includes a command line example of how to invoke the box. So my box, Windows2012R2 can be installed by any vagrant user by running:

vagrant init mwrock/Windows2012R2

If I am on my windows box with Hyper-V, it will install the Hyper-V box (make sure to add --provider hyperv to your vagrant up command or set the VAGRANT_DEFAULT_PROVIDER environment variable). On my Ubuntu desktop with VirtualBox it will download the VirtualBox box. After it downloads the box, it caches it locally and does not need to download again.

So there you have it a free windows box under 3GB. Ok...ok, thats still crazy huge but I didn't name this blog Hurry up and wait! for no reason. A little hurry...a little wait...ok maybe alot of wait...whatever it takes to get the job done.

Deannoyafying a default windows server install

$
0
0

This is a somewhat opinionated follow up to last week’s post on how to create a windows vagrant box. What I left out were a few settings you might want to include to prevent you from going absolutely bonkers. While many may argue that it is too late for myself, one goal of this post is to keep others from my own fate.

I’m just going to cover three configuration settings here and one of them applies to windows client installations, not just server SKUs. There are other improvements one can make for sure but these are easily up at the top.

IE Enhanced Security Configuration – turn it off

Sure, the Amarican Society of therapists and social workers does not want me to tell you this. But trust me on this one because both you and those around you will benefit. Unless you belong to the small subculture of technology workers that enjoy pointing and clicking several times prior to previewing any single web page, add this to your windows base images:

Write-Host "Disabling IE Enhanced Security Configuration (ESC)."
$key = "HKLM:\SOFTWARE\Microsoft\Active Setup\Installed Components"
$AdminKey = "$key\{A509B1A7-37EF-4b3f-8CFC-4F3A74704073}"
$UserKey = "$key\{A509B1A8-37EF-4b3f-8CFC-4F3A74704073}"
if(Test-Path $AdminKey){    
  Set-ItemProperty -Path $AdminKey -Name "IsInstalled" -Value 0    
}
if(Test-Path $UserKey) {    
  Set-ItemProperty -Path $UserKey -Name "IsInstalled" -Value 0    
}

This is a script I use generically on many windows machines and it will simply do nothing on client SKUs since it checks for the registry locations.

Do not open server manager at logon

Don’t worry everyone. I assure you that you can still manage your server even without server manager. This is the dashboardy looking app that comes up on windows server immediately after logon. Its one redeeming feature is that it exposes a way to turn off IE Enhanced Security Configuration. Here is an excerpt from our CenturyLink Cloud default windows Chef recipe that turns this off:

# Disable the ServerManager.
registry_key 'HKEY_LOCAL_MACHINE\SOFTWARE\Microsoft\ServerManager' do
  values [{    
    :name => 'DoNotOpenServerManagerAtLogon',    
    :type => :dword,    
    :data =>  0x1    
  }]
end

Of course you can do the same without Chef with this bit of powershell:

Write-Host "Disabling Server Manager opening at logon."
$Key = "HKLM:\SOFTWARE\Microsoft\ServerManager"
if(Test-Path $Key){  
  Set-ItemProperty -Path $Key -Name "DoNotOpenServerManagerAtLogon" -Value 1
}

Sensible windows explorer settings

This tends to drive me nuts. I can’t tell .bat files from .cmd files. I cant find my ProgramData folder. I’m initially excited that my 100TB page file has disappeared then crushed to discover its there and I just don’t see it. The world is not well. This script makes it right:

$key = 'HKCU:\Software\Microsoft\Windows\CurrentVersion\Explorer\Advanced'
if(Test-Path -Path $Key) {  
  Set-ItemProperty $Key Hidden 1  
  Set-ItemProperty $Key HideFileExt 0  
  Set-ItemProperty $Key ShowSuperHidden 1
  Stop-Process -FilePath explorer
}

Who would NOT want to show Super hidden files?

Adding a couple light weight apps for extra sanity

There are a couple other things that I find unacceptably annoying but there is no simple configuration fix for these. Both mentioned here can be solved with a small install:

A tears free command line console

Windows 10 (in technical preview as of this post) is finally fixing some of this but in the meantime I use console that supports key mappings for human consumables copy/paste shortcuts and tabbed consoles since it is not uncommon for me to have half a dozen command lines open. It works with both powershell (site staff recomended) as well as the traditional command line. Many others really like the ConEmu console emulator.

Text editor that understands how lines end

When it comes to lite text editing, notepad is not so entirely bad in a 100% windows universe. However these days I work in a mixed environment and transfer bootstrap scripts from a linux box. If I need to inspect those files after they have made their way to a windows server, I'll often be faced with a one line file. While reducing the prior logic to a single line is impressive, the end result may mean having to use Wordpad to view the files. Is that wrong? Yes...yes it is. Text editors can be a very personal decision. I prefer sublime text 3 on which I am happy to spend the 50 bucks or whatever it was I spent, but there are lots of good free options available.

A chocolatey package to automate away the annoying

I have wrapped all of the three config changes above into a chocolatey package win-no-annoy. You can check out the complete powershell script that it will run here. If you are working with a newly provisioned machine or any machine that does not have chocolatey installed, use boxstarter to run the script which will also install chocolatey. Assuming IE is still the default browser, run the following command:

START http://boxstarter.org/package/nr/win-no-annoy

I hope your windows server experience will be much less annoying with these improvements made.

Viewing all 109 articles
Browse latest View live